MetaServer > Help > Import from Folder
020-020 MetaServer Import – Import from Folder
MetaServer’s Import from Folder feature allows you to watch one or multiple folders in the same workflow and process imported PDF / TIF / JPG / Word* / Excel* files or TXT* files. You can use MFPs (Multi-Functional Peripheral like a digital copier/scanner/printer), Network Scanners, scan-to-folder oriented systems, such as Fujitsu ScanSnap, or any device that can send a PDF, TIF, JPG, Word*, Excel* or TXT file to a synced cloud folder (DropBox, Google Drive, Box, etc.) like a smartphone running a scan app.
Each import folder action in a workflow can have a different next action. Consequently, you can process a document differently depending on the watched folder you place it in.
For example:
An MFP for an insurance company has 2 buttons that are linked to different watched folders in a workflow for processing their application forms:
– A “Single” button, for scanning a single application form. It will go straight to the Extract action.
– A “Multi” button, for scanning a set of multiple application forms.
The MFP will create 1 document holding all the application forms in the set, so they need to go through a Separate Document and/or Organizer action first before going to the Extract action.
Some other example use-cases:
– Truck drivers scan POD documents with their smartphone and the result is sent to a central Dropbox folder to trigger a business process.
– A law firm has MFPs set up in their office and scan case-related documents to a network folder to automatically save them in the correct case folder with a meaningful name, including the date and document type.
– A catering company receives incoming invoices through e-mail and snail mail. So, they watch an email inbox for incoming invoices and scan their physical invoices to a watched folder. MetaServer extracts all relevant data such as supplier name, invoice number, amount, due date etc. and uploads the data in QuickBooks for booking and payment.
– A pest & termite control service scans their inspection reports to a watched folder to archive them in a comprehensive folder structure.
*IMPORTANT: before you are able to import “Office Documents” (Word (DOC, DOCX, RTF)), Excel (XLS, XLSX) or TXT (TXT, CSV) files), you need to have a license for the “Import Office Documents” module.
If the module is not licensed and you enable the Word, Excel or TXT file type in an Import action, the importer will show an error in the Server tab as soon as it tries to import an Office document:
“Module ImportOfficeDocuments is not licensed.”
To avoid the error, disable the Word and Excel “File type” options from your Import Folder and Import Email actions or purchase a license of the “Import Office Document” module.
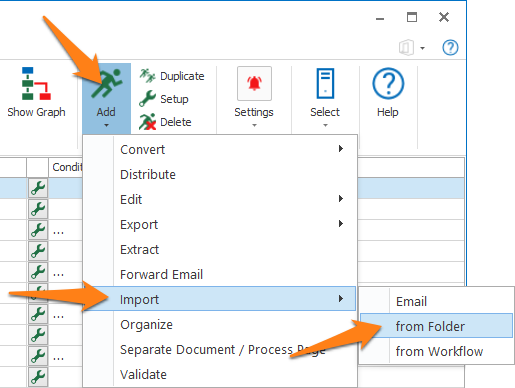
To add an Import from Folder action, select the action after which you want to insert the Import from Folder action and press Add -> Import -> from Folder. The Setup window will automatically open.
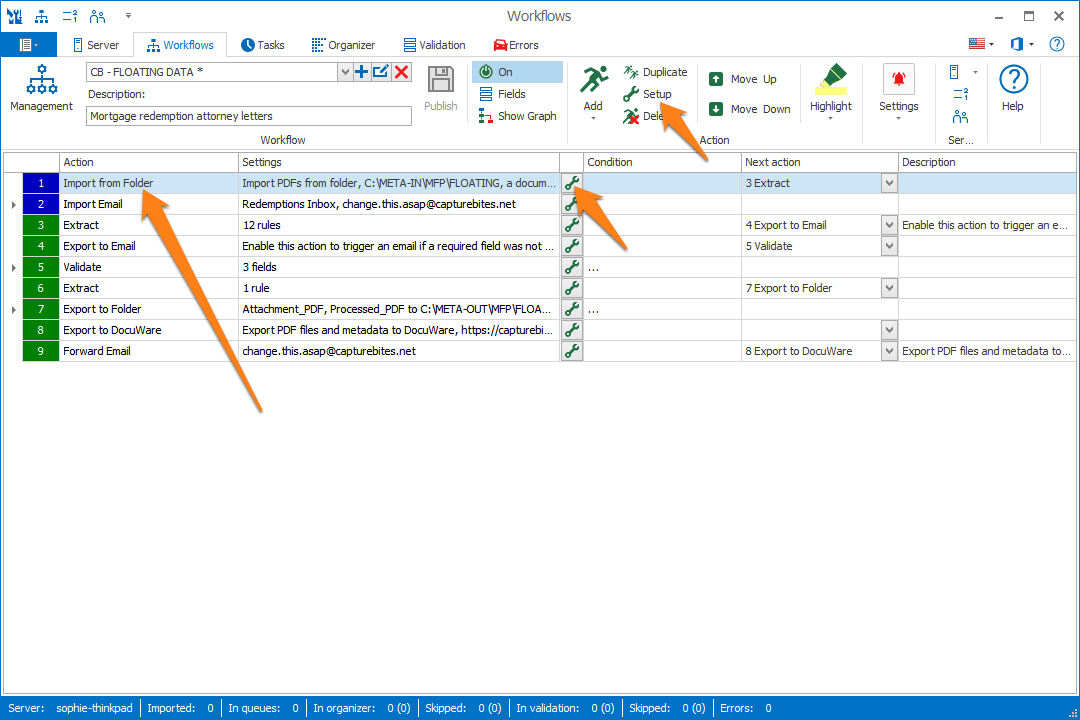
You can also open the setup window of an existing Import from Folder action by double clicking the action or by pressing the setup button on the right side of the action or in the ribbon, as shown below.
In our example, we will make use of the “CB – FLOATING DATA” workflow. This workflow is automatically installed with CaptureBites MetaServer.
TIP: The thumbnail on the right will follow you, so you can easily refer to the Setup window. Click on the thumbnail to zoom in.
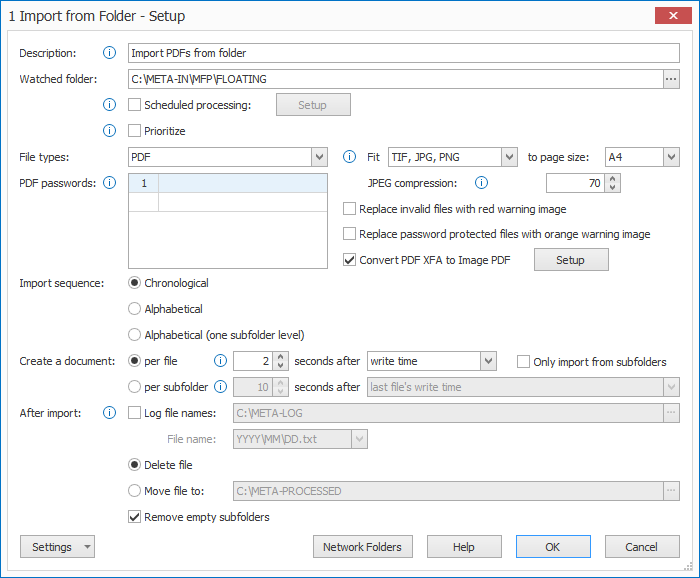
01 – Watched folder: you can browse to the watched folder using the “…” button or enter the path manually. Make sure this path already exists.
02 – Scheduled Processing: enable this option to only let MetaServer start importing all available documents at the defined time(s). When finished, MetaServer will wait until the next defined time to import more documents.
Press the Setup button to open the setup window:
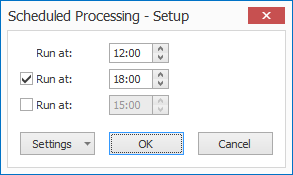
For example, if you want to process all documents scanned so far at 12:00 at noon and at 18:00 (6 PM), then you set Time 1 to 12:00 and Time 2 to 18:00.
You can define up to 3 different times.
This feature can be used in a notification workflow to send email notifications to people who received scanned mail by postal services. This is a short description of the logic:
You have to define 2 workflows:
Workflow 1: The first workflow saves the scanned mail once in the user folders and a second time in the watched folder of the second workflow. So you have to define two Export to Folder actions in your main workflow.
The second export is configured in “overwrite if file exists” mode and exports the scanned mail a second time to the watched folder of workflow 2 which will send the notification emails. If a user has received one or more mailings, there will be one PDF in the watched folder of workflow 2 for that user.
If a user has not received any mail, there will be no PDF in the watched folder of workflow 2.
Workflow 2: The second workflow uses the new “Scheduled processing” option and imports PDF files at 12:00 or another moment in time.
The second workflow does nothing with the PDF, it mainly uses it as a trigger to send a notification email to each user who has received an email. User information and other information can be contained in the file name to pass it to the second workflow and to use it in the notification email.
In short, workflow 2 consists of 3 actions:
Action 1) Import is only done once a day, but you have the flexibility to schedule it up to three times a day at fixed times. You have to delete the imported files to get this notification processing daily.
Action 2) The Extract action is purely there to extract data from the name and subfolder of the imported PDFs (recipient name, recipient email,…) for use in the notification email.
Action 3) Export to Email. You select PDF attachment but you uncheck “Attach files”. The idea is to send an email notification without attachments.
03 – Prioritize: enable this option to let this import action overtake any other documents in the processing queue.
In the Server tab, you can set the Priority Queu Limit to set the maximum number of documents (between 1 and 250) that can be imported in priority mode. Priority documents can only overtake documents that are scheduled for processing. A document that is in the middle of being processed cannot be overtaken.
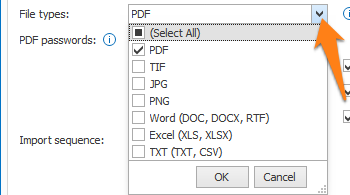
04 – File types: here you can specify the file types that will be imported. Press the drop-down arrow to select the desired file types. Right now, we support PDF, TIF, JPG, PNG, Word (DOC, DOCX, RTF)*, Excel (XLS, XLSX)* or TXT (TXT, CSV)* files.
*IMPORTANT: before you are able to import “Office Documents” (Word (DOC, DOCX, RTF)), Excel (XLS, XLSX) or TXT (TXT, CSV) files), you need to have a license for the “Import Office Documents” module.
If the module is not licensed and you enable the Word, Excel or TXT file type in an Import action, the importer will show an error in the Server tab as soon as it tries to import an Office document:
“Module ImportOfficeDocuments is not licensed.”
To avoid the error, disable the Word and Excel “File type” options from your Import Folder and Import Email actions or purchase a license of the “Import Office Document” module.
05 – PDF passwords: if you want to import password-protected PDFs, enter all possible passwords here. If none of the passwords work when importing a PDF, the document will be moved to the Errors tab.
IMPORTANT: In your export action(s), select “Imported PDF” to export the original version with password. Select “Processed PDF” to export a version without password.
06 – Fit TIF, JPG and PNG to page size: enable this option to reduce very large TIF, JPG or PNG files to A4 or Letter Size. Image quality is preserved, only the paper size is updated. JPG and PNG images with small dimensions such as receipts or business cards remain untouched.
For example, documents captured with a smart phone in JPG or PNG format often have incorrect, too large page dimensions causing data extraction and viewing problems.
07 – JPEG Compression: by default, the JPEG compression is set to 70. A higher value results in better image quality but larger files. The JPEG compression setting is used throughout the workflow every time an action needs to change a PDF.
IMPORTANT: Some actions, like the Convert to Multipage TIF action and Convert to Searchable PDF action (using the Tesseract engine), have their own Q-factor setting. This individual setting always takes precedent.
08 – Replace invalid files with red warning image: when enabled, invalid/corrupt files will be replaced with red warning images. This makes it visually clear that some files were corrupt.
09 – Replace password protected files with orange warning image: when enabled, password protected files will be replaced with orange warning images. This makes it visually clear that some files were password protected.
10 – Convert PDF XFA to Image PDF: this option is enabled by default. PDF XFA is a legacy format that is not supported by Adobe anymore and was replaced by “ACROFORM”.
For archiving purposes, you still may need to process PDF XFA files, but they will cause a lot of problems because of their unsupported, complex format. To avoid these problems, this option automatically converts PDF XFA to an Image PDF.
You can press the Setup button to adjust the JPEG Compression of the Convert to Image PDF engine.

11 – Import sequence: here you can choose if you want to import your documents chronologically or alphabetically.
Alphabetical (one subfolder level): import per subfolder based alphabetically.
12 – Create a document per file / subfolder [x] seconds after [x]: you can choose to create a document:
per file: each imported file creates a document.
[ x ] seconds after write time: the default. When a file is created in parts, like when an FTP server is writing to a folder, the write time is continuously updated. The write time is the most accurate time stamp to decide to start the import of a file if a device or an FTP server writes directly in the watched folder and works in the majority of the cases.
[ x ] seconds after access time: the last file’s access time is updated when you copy a file from one folder to another. We recommend this option when copying existing files in the watched folder. This is because the write time is not updated by windows when you just copy a file into the watched folder.
Only import from subfolders: enable this option if you only want to import files coming from subfolders in the watched folder. Any files outside of a subfolder will not be imported.
per subfolder: create a document per subfolder in the watched folder containing JPG, TIF, PNG and PDF files each representing a page of the final document.
For example, if you import the following:
WATCHED FOLDER\DOCUMENT001\001.JPG
……………………………………\002.JPG
……………………………………\003.JPG
WATCHED FOLDER\DOCUMENT002\001.JPG
……………………………………\002.JPG
……………………………………\003.JPG
……………………………………\004.JPG
The output would be 2 PDFs with the the 1st PDF containing 3 pages and the 2nd PDF 4 pages.
[ x ] seconds after last file’s write time: the default. When a file is created in parts, like when an FTP server is writing to a folder, the write time is continuously updated. The write time is the most accurate time stamp to decide to start the import of a file if a device or an FTP server writes directly in the watched folder and works in the majority of the cases.
[ x ] seconds after last file’s access time: the last file’s access time is updated when you copy a file from one folder to another. We recommend this option when copying existing files in the watched folder. This is because the write time is not updated by windows when you just copy a file into the watched folder.
01 – Log file names: enable this option if you want to create a log for each imported document. You can specify the location by browsing to a folder or entering a path manually. If the path does not already exist, it will be created automatically.
The logged information includes:
- Import timestamp (YYYY/MM/DD HH:mm:ss.fffff)
- Workflow name
- Original file name
- Original file full name (= with file extension)
1) File name: here you can choose how to store your import-log files. You have the option to store them in sub-folders and name them based on the imported document’s import date year, month and / or day.
This way, all import-logs with the same import date will be merged in 1 file. You also have the option to store all logs in 1 file named “MetaServer.txt”, regardless of the import date.
02 – Delete file / Move file to: once a document is imported in MetaServer, you can choose to delete it from the watched folder or you can move it to another folder for archiving purposes.
03 – Remove empty sub folders: disable this option if you don’t want to remove empty sub folders. This can be useful if, for example, the sub folder names in the watched folder hold the name of the person who scanned the document. The name can then be used in an Extract action’s Reserve rule to reserve the document for Validation by the person who scanned the document.
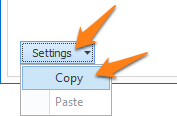
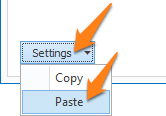
TIP: you can copy the current settings and paste them in another setup window of the same type. Do this by pressing the Settings button in the bottom left of the Setup window and by selecting Copy. Then open another setup window of the same type and select Paste.
