Macro
Run a series of programmatic steps before and after export. No coding, just configuring macro rules!

With the CaptureBites Macro connector for Kofax Express, you can execute a series of programmatic steps before and after export.
You can run a batch command file, or an external program performing post-processing of index files for example.
The sample jobs “CB Macro ZIP after Export” and “CB Macro Excel Index” included with the installer is a good start to learn how this works.
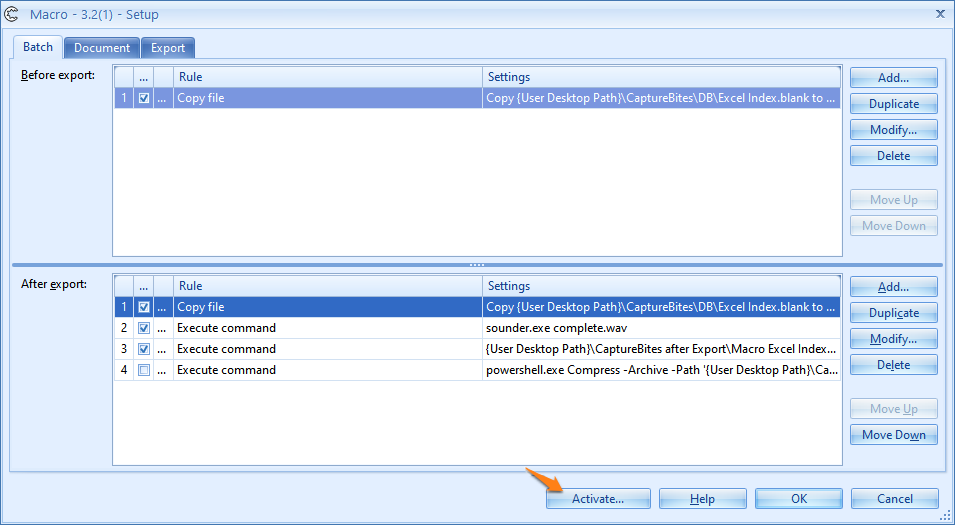
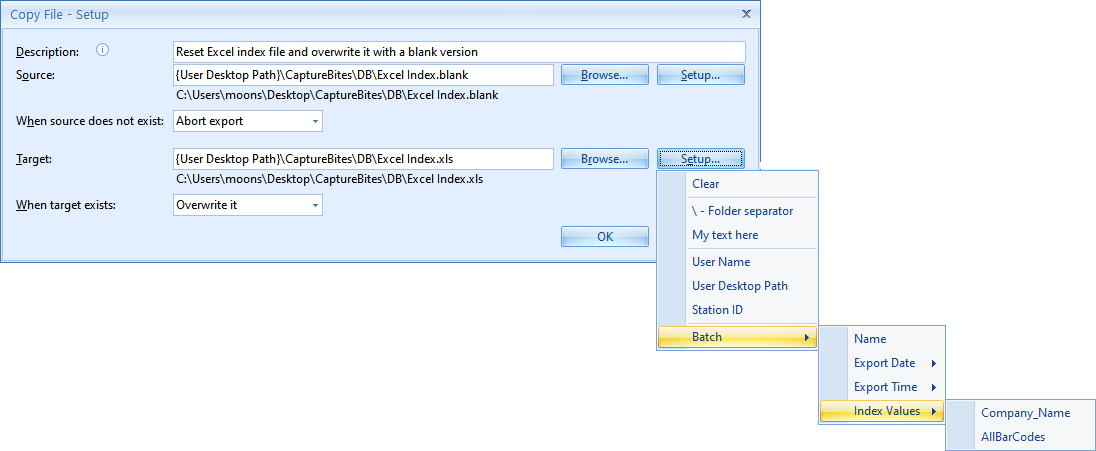
In the sample job, we first make use of the Macro connector to overwrite the master Excel file with a blank version before the export process starts.
Next, we update the Excel file with the CaptureBites Database Export Connector and output all scanned documents as PDF files.
Once the Excel is file is updated and the export is completed, we use a macro command to copy the updated Excel file to the export folder of the images and, as such, create a document index file in native xls format for every scanned batch.
When the creation of the Excel file is complete we use the Macro Connector to play a sound and open the excel file in the associated windows program (typically Microsoft Excel).
The file paths and commands are completely configurable with fixed values, system values and Kofax Express index values.
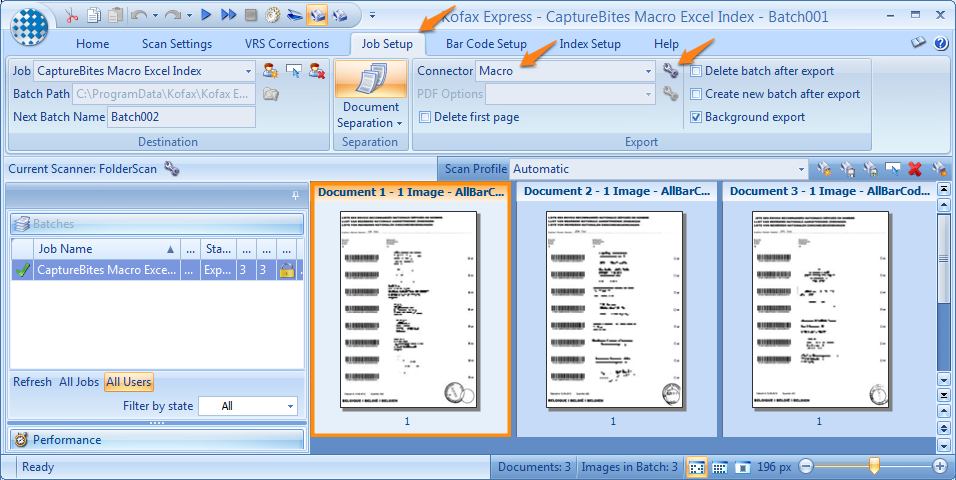
You enable the Macro connector by selecting it as the export connector in the Kofax Express Job Setup tab.

Press the Setup button and first activate the connector by pressing the “Activate…” button in the setup window. The activate window will display an express ID which you need to send us when requesting a trial activation code.
NOTE: you can only export with the Macro Connector if you have a Kofax Express production license. You can’t export using an evaluation license.
The main export connector is selected in the Export tab. This is the export connector that will export your scanned documents and index information. Any installed connector can be selected.
In our demo job, we are using the the CaptureBites Database Export Connector to update an Excel file via ODBC which will serve as our batch index file.

With the Execute command rule you can run any windows command, robocopy command, powershell command, a complete script as a batch command file (.BAT files) or a windows program before or after export of the batch or before or after export of each individual document.
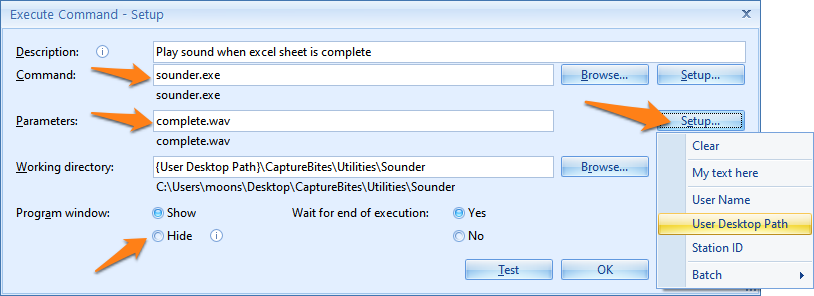
You simply specify the command, the executable or .bat file in the Command field. Optionally add some parameters (also known as command line parameters) and define the working folder.
For example, in our demo job we run a small program to play sound files at the end of the export. You can quickly check your command rule settings by pressing Test.

PowerShell
With CaptureBites Macro you can compress the whole batch after export as a single zip file.
Since windows 7, PowerShell is included with windows and you can use it to compress your exported batch as a zip file at the end of the export process with a single command.
PowerShell is a much more powerful command-line shell than the traditional Windows Command Prompt and you don’t need to install anything.
Below example shows a macro rule running a PowerShell command to compress the content of an exported batch as a single zip file. If your batch name is called BATCH-0001, the resulting ZIP file will be called BATCH-0001.ZIP.
This is a basic PowerShell command that you can use as a start to
Compress-Archive -Path 'C:EXPORT{Batch Name}*.*' -DestinationPath 'C:EXPORT{Batch Name}' -Update
NOTE: Paths are enclosed in single quotes when using PowerShell commands as opposed to double quotes when using the traditional windows commands.
When running batch command files, you would typically enable the Hide program option to prevent the black command window to pop up. If you want to see the complete job setup, have a look at the CB Macro ZIP after Export job included with the Macro installer.
If you want to see the complete job setup to “zip your batches”, have a look at the CB Macro ZIP after Export job included with the Macro installer.
Find the complete description of the PowerShell Compress_Archive command here.
7-Zip
With CaptureBites Macro you can also compress the whole batch after export as a single zip file protected by a password.
NOTE: you need to have 7-Zip installed on your system in order to create password-protected zip files. You can download it for free here:
https://www.7-zip.org/download.html
Below example shows a macro rule running a 7-Zip command to compress the content of an exported batch as a single zip file with a password. If your batch name is called BATCH-0001, the resulting ZIP file will be called BATCH-0001.ZIP.
This is a basic 7-Zip command that you can use as a start to
a [ EXPORT PATH OF ZIP ] -tzip [ PATH OF FILES TO BE ZIPPED ]* 1>7za -p{@Password}
If you only want to zip a certain file type, you need to specify the file extension:
a [ EXPORT PATH OF ZIP ] -tzip [ PATH OF FILES TO BE ZIPPED ]*.[ FILE EXTENSION ] 1>7za -p{@Password}
In the above cases, the password is a variable.
NOTE: When running batch command files, you would typically enable the Hide program option to prevent the black command window to pop up.
As a result, after export, when you try to unzip your ZIP file, you will be asked to first enter the password.

Below is another example of a command rule used in the demo job. We simply “run” the

This also works very well with TXT, CSV, PDF, JPG files etc.
Do you have a feature request for the CaptureBites Macro connector?
Thanks to its modular design based on a collection of simple Rules, the CaptureBites Macro connector will be regularly updated with new functionality.
So visit this page regularly to check what’s new or contact us and let us know what you would like to see next in the CaptureBites Macro connector.
About the download and included demo job
The download installs the CaptureBites Database connector and the CaptureBites Macro connector. It also includes demo images and a demo job called CB Macro Excel Index to show the functionality. It also installs a sample MS Excel Sheet called Excel_Index.xls.
The Macro connector requires a trial activation code to see it in action. Just send us a request for a trial activation code.
After you activated the Macro connector with your trial code, just export the pre-scanned batch of the CB Macro Excel Index demo job and check the Excel Index file by looking at the result after export. You can find the export result on your desktop in DesktopCaptureBites after Export.


