MetaTool > Help > Extraction > Find Line with Mask / Words
060-560 MetaTool Extraction – Find Line with Mask / Words
MetaTool’s Find Line with Mask / Words makes it possible to find a line of text containing or not containing certain words or masks.
The Find Line with Mask / Words is very useful when you need to extract data from documents that don’t have a fixed format. The classic example is a supplier invoice. All invoices have an invoice date, number, total amount etc. but the data is located on a different place for each supplier.
You typically define an OCR extraction rule first to hold the full text of a scanned document in an index field we call Text Block or Full Text. Next, you would define a Find Line with Mask / Words rule to filter the full text and only keep relevant lines.
Finally you would define a Find Word with Mask / Words to extract the actual index value you are interested in.
For example to extract the invoice number from an invoice, you can search for lines containing the words: Invoice Number, Invoice Nr., Document Number, Invoice# etc. This would reduce the lines to the lines containing the invoice number. With a Find Word rule you can then extract the invoice number from the selected lines.
01 Find Line with Mask / Words – Add Rule
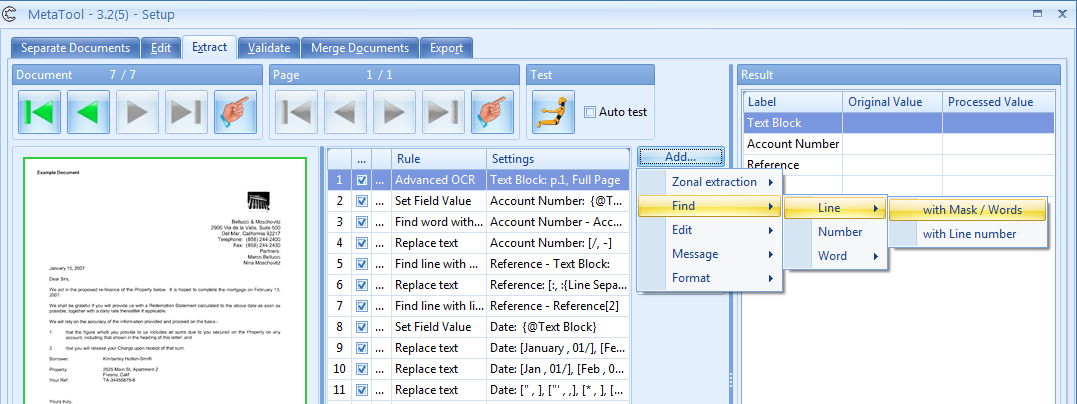
Find Line with Mask / Words is defined in the MetaTool Extract tab.
Press the Add button and select Find – Line – with Mask / Words to add the find rule.
02 Find Line with Mask / Words – Setup
In our example we will make use of the CB MetaTool Floating Data job. This job is automatically installed when you install CaptureBites MetaTool.
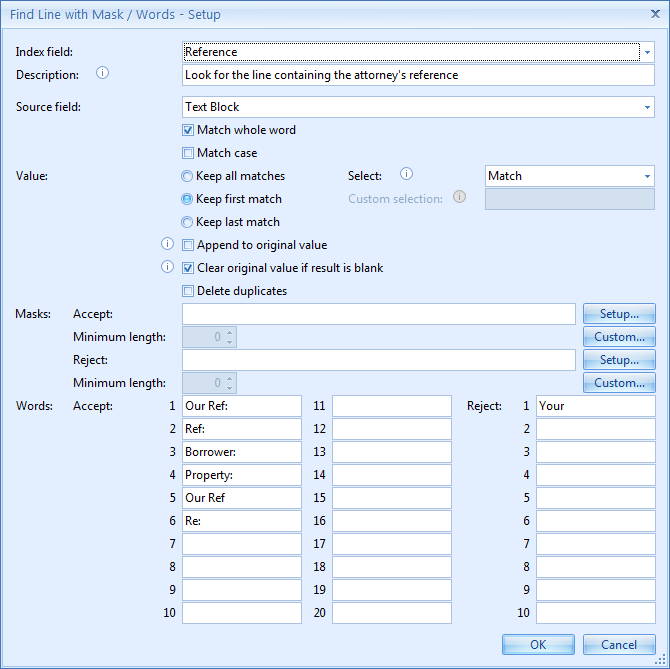
From below image samples we want to extract the reference. Sometimes the reference is on the same line with the label “Our Ref:”, sometimes it is labeled “Borrower:”, “Re:” etc .


To extract the lines containing the reference, select the index field to hold the extracted data.
In this case we select the index field “Reference”.
Optionally enter a description.
TIP: The thumbnail on the right will follow you, so you can easily refer to the Setup window. Click on the thumbnail to make the image larger.
1) Match whole word: only returns lines exactly matching the defined mask or word(s). When disabled, it will also return words containing the given word. For example: with “Match whole word” disabled and when searching for “apple”, it would also return lines containing “pineapple”.
2) Match case: will make the search Case Sensitive. If the searched word is “Our Ref:”, for example, it will only return words in exactly the same case. Disable the option to also find “our ref:”, “OUR REF:”, “Our ref:” etc.
02 – Value: you can specify which lines you want to keep, there are 3 options:
1) Keep all matches: this will return all lines containing the defined accept mask or accept words and not containing the defined reject mask or reject word(s).
2) Keep first match: this will return the first line containing the defined accept mask or accept words and not containing the defined reject mask or reject word(s).
3) Keep last match: this will return the last line containing the defined accept mask or accept words and not containing the defined reject mask or reject word(s).

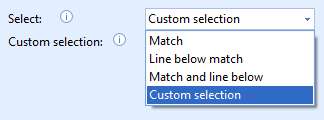
1) Select Match: select the same line as the one matching the search criteria.
2) Select Line below match: select the line following the line matching the search criteria.
3) Select Match and line below: select the line matching the search criteria and the next line.
4) Select Custom selection: select the line(s) specified in the list.

You can select the lines by their number, relative to the line matching the search criteria.
For example: 1 is considered the same line as the one matching the search criteria, 2 will select the line after the match.
Negative numbers identify lines before the match.
For example: -1 selects the line before the match.
Line ranges are defined with a hyphen (-), for example: 1-3
You can combine line ranges and line numbers with commas, for example: -1, 2-3
More examples:
1-3: a range that selects the match and two lines following that match (3 lines in total)
3: selects the 2nd line after the match
-1,2: selects the line before the match and the line following the match (2 lines in total)
-1-2: a range that selects from the line before the match up to the line following the match (3 lines in total)
-3- -1: a range that selects the 3 lines before the match (3 lines in total).
1,3 or 3,1: both return the same result, the original sequence is always preserved.
04 – Append to original value: the result will be added to the value that is already in the index field. It will otherwise overwrite the result.
05 – Clear original value if result is blank: if the rule does not result in any value, the selected index field will be cleared.
06 – Delete duplicates: this will delete all duplicate matches and the result will only return unique values.
03 Find Line with Mask / Words – Masks Setup
Masks are used to search for a line containing a word with a format also known as a regular expression. However you don’t need to use complex regular expressions. MetaTool uses an easy to use formatting pick list and you can construct your mask by selecting the elements you need.
Example: you want to find the date which is on the same line as the telephone number. Assume telephone numbers always look like 859-232-0000. Then you would look for a line containing a mask: {9(3)}-{9(3)}-{9(5)} with a minimum length of 12. This would select the line containing a telephone number. Next, with a Find Word rule, you would then find the date in that line.
The Reject mask is to skip lines containing words with the defined Reject mask.
For example, if you want to skip all lines containing dates between the years 1900 and 1999, you could define a reject mask like 19{9(2)}. See below for details about the mask syntax and how to define a mask.
When you have both Accept and Reject defined in a single rule: Accept and Reject work in an AND relationship. In other words all the lines containing words matching the reject mask or containing any of the reject words are first eliminated. Then the remaining lines are used to only keep the lines containing words matching the accept mask or containing any of the accept words.
02 – Setup of an Accept or Reject mask: By pressing the Setup button, you can select different format types to compose your mask. Setting up a mask is therefore very easy and more intuitive than using regular expressions.
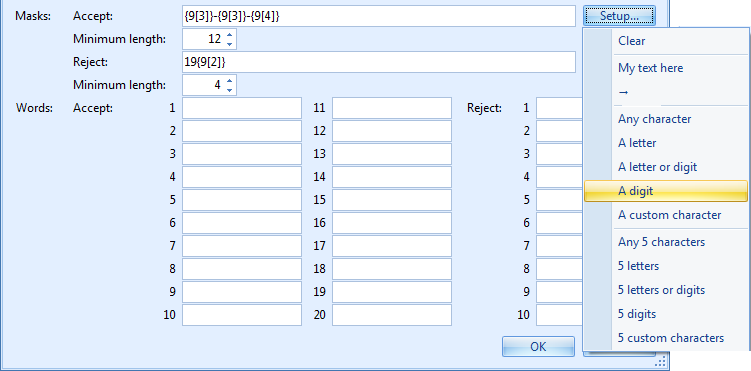
2) My text here: an example text. You can overwrite it with your own text if your masks consist of fixed characters. It’s also possible to type directly into the mask box.
03 – Custom: By pressing the Custom button, you can choose the custom characters represented by the {C} element(s) in your mask.

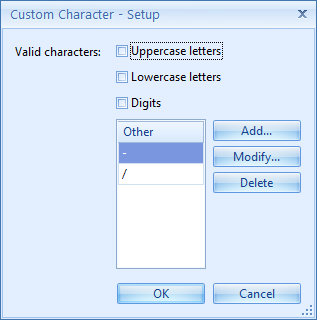
04 – Minimum length: If you want read partial masks, set the minimum length lower than the total length of the mask.
To explain how the Minimum length setting works, consider below settings:
Examples:
12345678:
OK because the number of characters is greater than or equal to the defined minimum of 8 and the value only contains digits.
1234567:
NOT OK because the number of characters is smaller than the defined minimum length of 8.
12345678901:
NOT OK because longer (11 digits) than the total length of the defined mask, if you want to accept lines with words containing 10 digits, you would need to disable “Match whole word.
A12345678:
NOT OK because it contains other characters than digits and therefore does not comply to the defined mask.
04 Find Line with Mask / Words – Words Setup
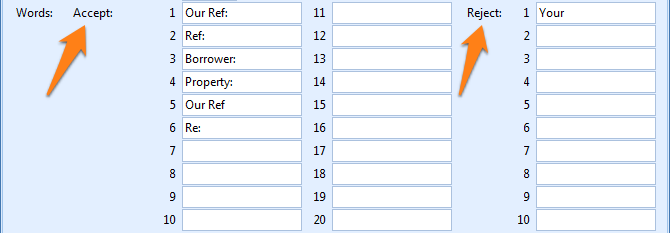
Here you can specify words that should or shouldn’t be included in the lines.
