MetaServer > Help > MetaServer Installation Check-List
How to prepare for a MetaServer installation
Before installing MetaServer on the customer’s system, we need the following:
The name, email address and phone number of a contact in the customer’s IT department in case of security issues, assistance to access a SQL database (for systems using DB Lookup).
Please add the following paths to the exception list of the antivirus software on the machine running the MetaServer service:
“C:\CaptureBites\MsData”
“C:\ProgramData\CaptureBites”
“C:\Program Files (x86)\CaptureBites”
If your Data Drive is set to another drive letter than “C”, please also exclude the following:
“[ Data Drive Letter ]\ProgramData\CaptureBites”
You can adjust your Data Drive in the Admin Client’s Server tab.
Admin access rights on the machine running MetaServer and on its clients (if any) during installation.
Credentials with read/write permissions for the folder paths used to store the processed PDFs and data. UNC paths are preferred over mapped drive letters.
In case of database lookups in a SQL database, we need the name of the database and the table(s) with the relevant information and correct credentials to access the database table(s).
On the machine that will run MetaServer (not the PCs running the Operator client), the Windows Firewall settings need to be adjusted as described here.
– SMTP Server name
– SMTP Port
– SSL: Yes or No
– User name and password to access the SMTP server
– IMAP Server name
– IMAP Port
– SSL: Yes or No
– User name and password to access the IMAP server
IMAP4 on an Exchange server: By default, IMAP connectivity isn’t enabled in Exchange. To enable IMAP connectivity, find instructions here.
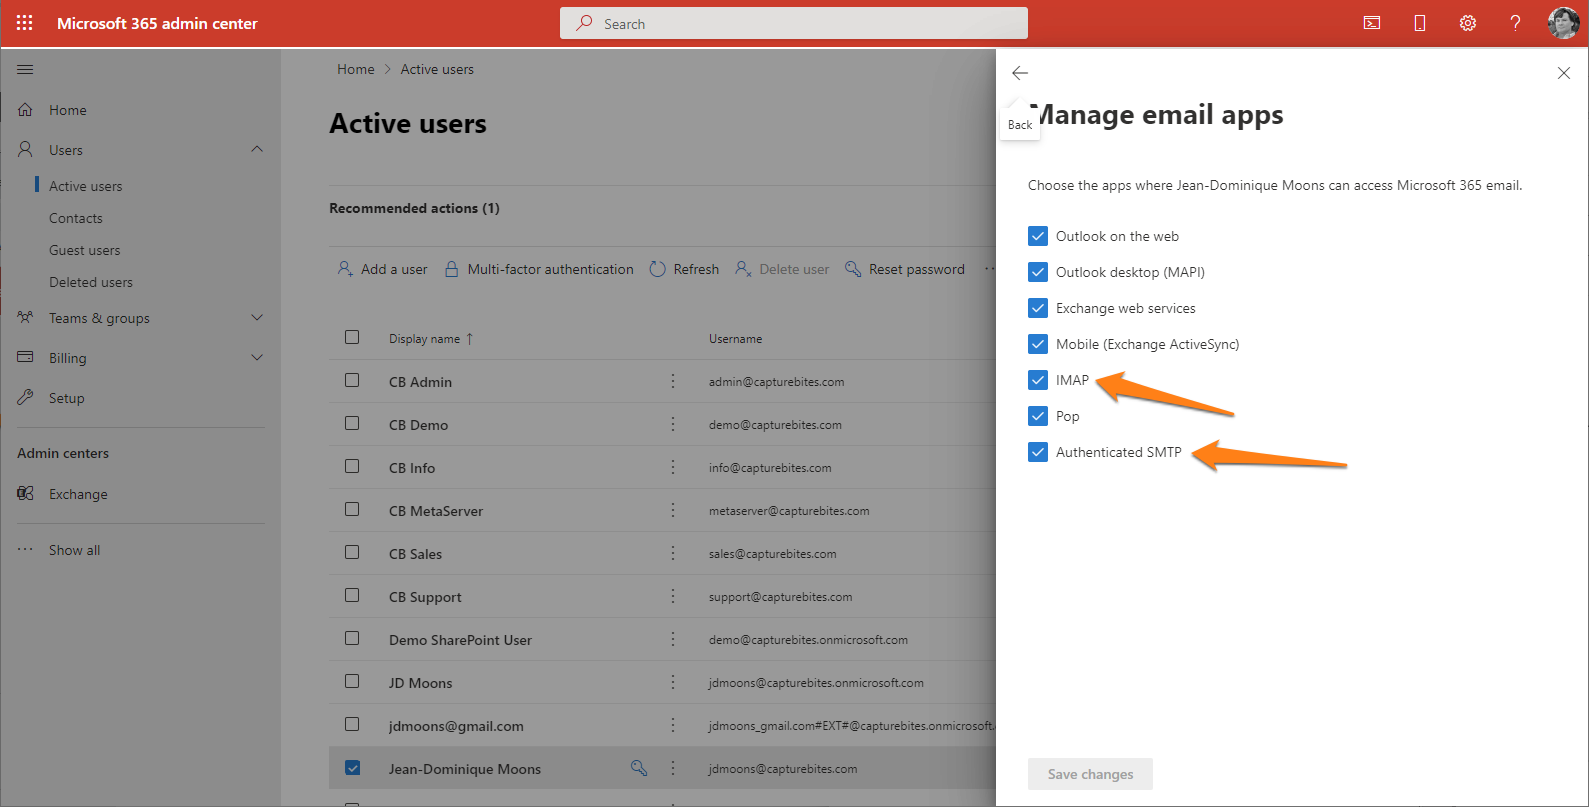
– For importing email from a specific inbox, IMAP needs to be enabled in Exchange for that inbox.
– For outgoing email (e.g. error mails, exporting and forwarding email), SMTP needs to be enabled in Exchange for the email user that will be used for sending emails from.
You can find these setting in Exchange online. If you use Exchange on-premise, the setup screens may look different.
Enable IMAP and SMTP for specific mailboxes:
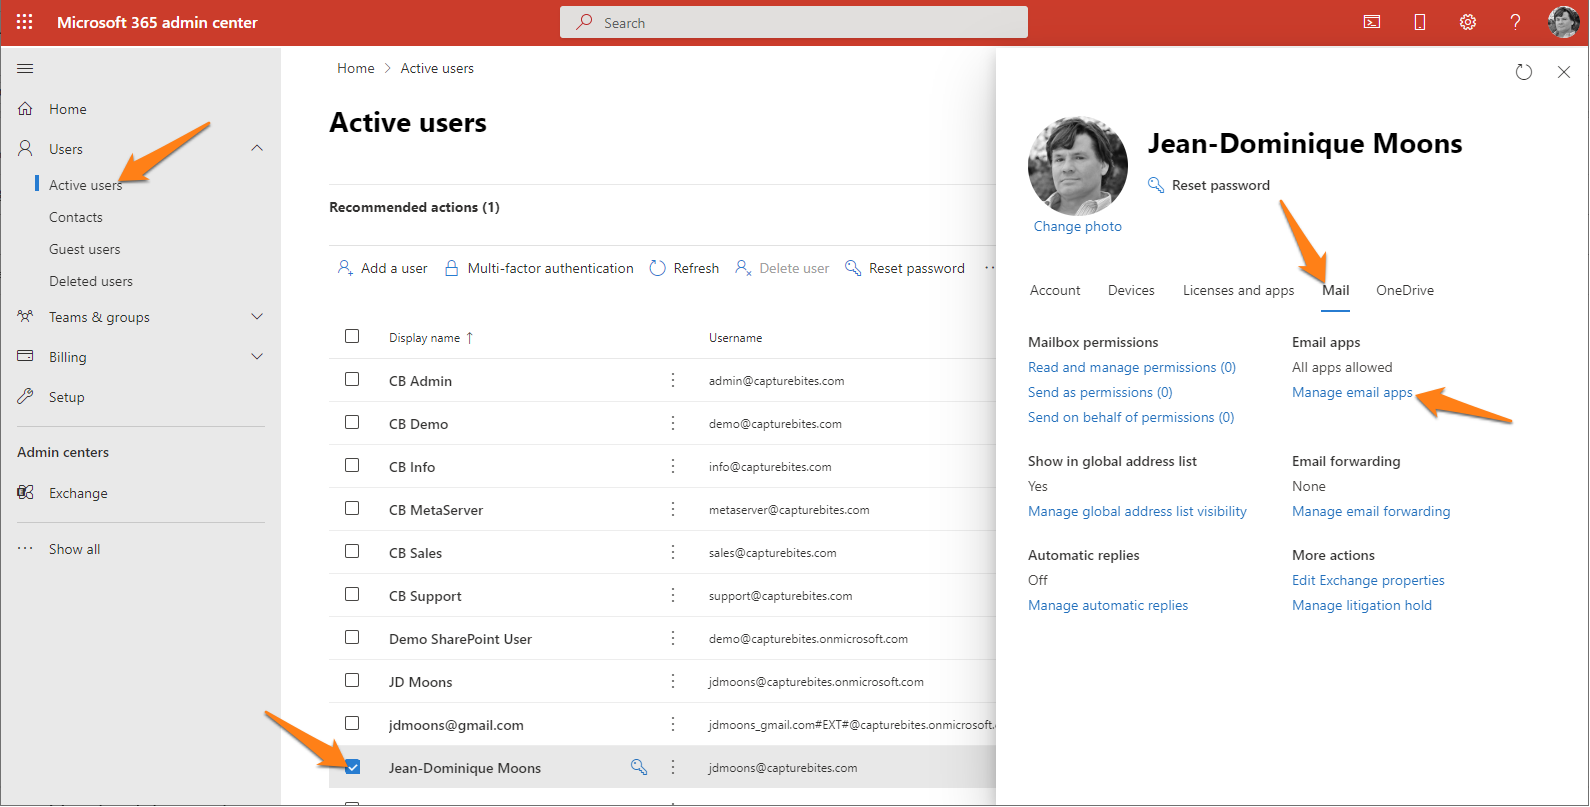
Step 1: Open the Microsoft 365 admin center and go to Users -> Active users.
Step 2: Select the user and, in the flyout on the right, click “Mail”.
Step 3: In the “Email apps” section, click “Manage email apps”.

Step 4: Verify the SMTP and IMAP settings. Unchecked = disabled, checked = enabled.

MetaServer requirements:
- Processor: Intel i7 (minimum) or equivalent server processor - For high volumes and high processing needs, a server build around a recent Xeon Gold Scalable processor or equivalent is recommended.
- Number of cores: More cores means faster performance. You can simulate the recommended number of cores for your solution using our online core calculator.
- Memory: 8 GB RAM or above (Recommended)
- OS: Windows 10 or 11* or Windows Server 2008 R2 and more recent
- Microsoft .Net Framework: 4.6.2 or higher. Find the latest .Net Framework here.
- Microsoft Visual C++ Redistributable: for Visual Studio 2015, 2017 and 2019 for x86. You can find the latest vc_redist.x86.exe here.
- Storage: 500 GB (minimum) - 1 TB (Recommended) HDD or SSD
- A stable internet connection
- Adjust Firewall and port settings on the machine running MetaServer. You can find instructions on our MetaServer online help page.
- In case you use Office 365 products for your databases (e.g. MS Access, MS Excel) it's required to install the 32-bit version. This will allow you to use and create ODBC data sources (need to be 32-bit).
MetaServer Administration Client / Operator Client specifications:
Note: These are the specifications for machines only running the MetaServer Administration or Operator Client software. If the Client(s) run on the server, the specifications for MetaServer apply (see previous).
- Processor: Intel i5 (minimum) - Intel i7, equivalent or above
- Memory: 4 GB RAM or above
- OS: Windows 10 or 11*
- Microsoft .Net Framework: 4.6.2 or higher. Find the latest .Net Framework here.
- Microsoft Visual C++ Redistributable: for Visual Studio 2015, 2017 and 2019 for x86. You can find the latest vc_redist.x86.exe here.
- Storage: 500 GB HDD or SSD
* Our products are technically compatible with Windows 7, 8, 10 and 11. Since Microsoft discontinued support for Windows 7 in January 2020, we recommend working with the most recent Microsoft OS system, Windows 10 or 11.
– Download and install MetaServer (the installer includes the MetaServer Service, Operator Client and Admin Client).
NOTE: You can also download separate installers for the MetaServer service and Admin and Operator Clients on our Downloads page.
– Download and install the Searchable PDF Module
– Download and install the Create installer Tool (to create back-ups of the configuration)
– We recommend installing one of the following PDF-Viewers:
– PDF-XChange Viewer (recommended)
Silent Installation / Uninstallation
To run an installer or uninstaller silently, you should add an "/s" at the end of the command line in your Windows Command Prompt.
In case of the MetaServer Service, if you have downloaded and saved the installer in your "Downloads" folder, the command line would be:
run C:\Users\[ USER ]\CaptureBites_Windows_MetaServer_-_Server_Base_3.1.exe /s
If you would like to perform a silent uninstallation, you can find all your CaptureBites related uninstallers here:
C:\Program Files (x86)\CaptureBites\Uninstallers\[UNINSTALLER NAME ]\Uninstaller.exe
NOTE: Install the following software separately if the Operator Client or Admin Client runs on a different machine than MetaServer.
– Download and install the Operator Client and / or the Admin Client
– You can find detailed instructions how to use multiple clients with a central MetaServer here.
– We recommend installing one of the following PDF-Viewers:
– PDF-XChange Viewer (recommended)
Silent Installation / Uninstallation
To run an installer or uninstaller silently, you should add an "/s" at the end of the command line in your Windows Command Prompt.
In case of the MetaServer Operator Client, if, for example, you have downloaded and saved the installer in your "Downloads" folder, the command line would be:
run C:\Users\[ USER ]\CaptureBites_Windows_MetaServer_-_Operator_Client_Base_3.1.exe /s
In case of the MetaServer Admin Client, if, for example, you have downloaded and saved the installer in your "Downloads" folder, the command line would be:
run C:\Users\[ USER ]\CaptureBites_Windows_MetaServer_-_Admin_Client_Base_3.1.exe /s
If you would like to perform a silent uninstallation, you can find all your CaptureBites related uninstallers here:
C:\Program Files (x86)\CaptureBites\Uninstallers\[UNINSTALLER NAME ]\Uninstaller.exe
Step 1: Download TeamViewer.
Step 2: Place the installer in a folder of choice and run it to install TeamViewer. Simply accept all defaults. We will use TeamViewer to remotely install the configuration and use it for future updates, new configurations and support.
Step 3: If you are familiar with TeamViewer, configure it to auto-start with Windows and allocate it a permanent password. Please provide us the TeamViewer ID and the permanent password. If you are not familiar with TeamViewer we can do the TeamViewer configuration for you during installation.
If you use a multifunctional printer-scanner, define shortcuts on the MFP’s touch panel to scan to the folders watched by MetaServer in PDF format.
1. We recommend the following MFP scanner settings:
– PDF or PDF/A multipage format
– Type / Mode: Color Photo (NOT Text or Photo + Text)
– Disable any special compression settings
– Disable searchable text options
– Resolution: 300 DPI
– Enable automatic page orientation / format
2. Specific settings for Lexmark MFPs:
– PDF or PDF/A Single File (“Single File” means one file containing multiple pages, this is also known as a multipage PDF file)
– JPEG Quality: 70
– Resolution: 300 DPI
– Darkness: 3
– Content Type: Photo
– Content Source: Photo/Film
Step 1: Install Kofax Express 3.2 (1GB)
- Download Kofax Express 3.2 by clicking on this link.
- Place the zip file in C:\Kofax-Software and unzip it.
- Install the software by running C:\Kofax-Software\install-kofax-express\Kofax Express Standalone Setup
- Accept all the proposed defaults during the installation.
Step 2: Install the latest Kofax Express 3.2 Fix Pack (15MB)
- Go to the Kofax Express 3.2 downloads page to download the latest Kofax Express 3.2 fix pack by clicking on this link.
- Place the zip file in C:\Kofax-Software and unzip it.
- Install the fix pack by running C:\Kofax-Software\kofaxexpress-3.2.0.XX\kofaxexpress-3.2.0.XX.exe
- Install the ISIS driver of your scanner. If the ISIS driver is not delivered with the scanner, google [Scanner Make] [Scanner Model] ISIS driver download to find the ISIS driver.
- After installing the ISIS driver, connect and switch on your scanner.
Step 3: Run Kofax Express and test your scanner
Step 4: Install any CaptureBites export connectors: Make sure you have run Kofax Express at least once before installing any CaptureBites export connectors.
Step 1: don’t connect your scanner yet.
Step 2: download and install your scanner’s 32-bit TWAIN driver:
https://imagescanner.fujitsu.com/global/dl/
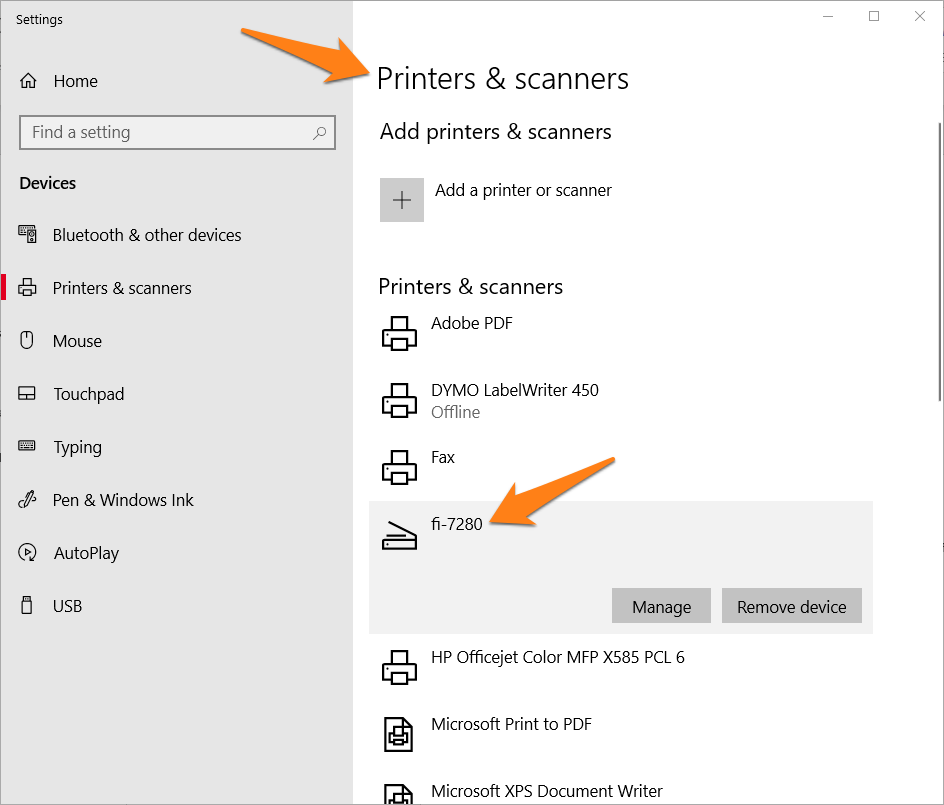
Step 3: after installation, connect and turn on your scanner and check if it’s recognized as a device by Windows. You can verify this by checking your “Printers & Scanners” in Windows 8 and 10 system settings (In Windows 7, check Device Manager).

Step 4: download and install the most recent version of PaperStream Capture:
https://imagescanner.fujitsu.com/global/dl/
If your scanner is not listed, make sure you have installed the correct driver and the scanner is switched on and connected properly (USB connectors on the back of the scanner and on the PC). If it’s still not working, reboot your PC and check again.
If the scanner still does not appear as a device, the scanner is not functioning properly, and you need to contact your scanner hardware supplier.
