Folder Export Help
Content
1. Overview
2. Installation
3. Requesting a trial activation code
4. About the included demo jobs
5. General setup
6. Create XML, CSV, TXT index data
7. Creating a Custom XML index file (ex. Excel XML)
8. Creating a Custom TXT file (ex. vCard or vcf file)
9. Output Searchable PDF or PDF/A
10. Output super compressed color PDF Files with the file size of black & white
11. PDF custom properties
12. Split PDF
13. Bookmarked PDF
14. Password protected PDF
15. PDF reader settings
16. Full text output of your scanned pages
17. Uncompressed or LZW compressed TIFF files
18. Backup Image Files
19. Your suggestions…
If you want to know how to activate your product, please visit this page.
1. Overview
- Use the versatile CaptureBites Folder export connector to export to a folder and file structure of choice on a local system or file server. You can define an unlimited number of sub folders and use Kofax Express index fields or system values to name them.
- Create CSV, TXT or XML index files at document or batch level in any format
- Create single page or multi-page TIFF or PDF image files
- Generate PDF/A files
- Generate Super compressed PDF files
- Generate Searchable PDF files using OCR
- Create full text output in standard txt format for each scanned page.
- Create bookmarked PDF files
- Configure PDF passwords
- Split PDF files to a defined maximum size
- Pre-define how the Adobe viewer displays your document
- Configure PDF custom properties
- Generate G4 and JPG compressed TIFF files but also LZW compression and uncompressed is supported for high quality scan work (book scanning, delicate document scanning)
- Next to an export destination of choice, you can also generate a backup of all your documents and index files to an external drive or backup server. All this during a single export
2. Installation
Download the Folder export connector from here.
The download installs a functional version of the CaptureBites Folder connector. It also includes some demo images and demo jobs to show the functionality.
3. Requesting a trial activation code
The CaptureBites Folder connector works in demo mode when it is not activated. In demo mode, a demo seal will be stamped in all exported images.
If you want to try out this product in full production mode without any limitation we can email you a trial code. Just follow the instructions when filling out the form.
4. About the included demo jobs
After downloading the CaptureBites Folder connector, install it, open Kofax Express and find sample jobs called:
- CB Folder Custom XML
- CB Folder Full Text Output
- CB Folder PDF Bookmarks
- CB Folder PDF with Password (Open Password = CapBites and Permissions Password = BitesCap)
- CB Folder Split PDF
Each of the jobs, include a sample batch. Export the sample batch and find the result on your desktop in a folder called “CaptureBites after Export”.
After installation, open Kofax Express. For each demo, you will find some pre-scanned batches in the batches panel.
Select the batch you want to try out. Export the batch and find the result in the “CaptureBites after Export” folder on your desktop.
The “CaptureBites Folder PDF with Password” uses following passwords:
- Open Password = CapBites
- Permissions Password = BitesCap.
In demo mode, a demo seal will be stamped in all exported images. You can switch the demo version to full production mode by entering an activation code which you can purchase from our partners. You can continue using any of the jobs you configured in demo mode after activation of the software.
You can also request a trial code to try the connector in full production mode.
5. General Setup Panel
Go to the Job Setup tab in Kofax Express and make sure the CaptureBites Folder Export connector is selected.
Open the Folder connector’s setup by clicking on the setup button next to the selected Folder Connector.

Enable the desired export streams and define destination paths and file names:
- Image File Choose TIFF or PDF and set additional settings by clicking Setup.
- Batch Header File This file is created at the end of an export and can serve as a trigger to start importing the information in the back-end system.
- Batch Index File The batch index file contains index information of all documents in a batch. Thus, only one batch index file is generated per batch.
- Document Index File A document index file is created per document. Thus, a batch with 200 documents will generate 200 document index files.
- Full Text Output This generates a text file containing the full text of each scanned page. The text is generated by performing OCR . You can create a text file per document or per page.

6. Create XML, CSV, TXT index data or generate a custom index format
The Folder connector provides full flexibility regarding the content, naming and export location of your index files.
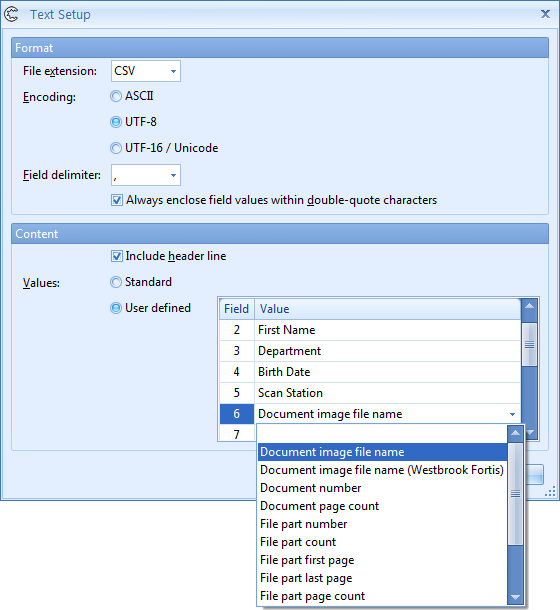
You can configure your CSV or TXT index files through an easy to use setup window. You can precisely select the index fields you want to include and determine the sequence of these fields.
Define encoding method, customize the field separator and include or exclude a field label header line.
7. Custom XML output.
You can freely define any XML output and accurately define the XML header, body and footer of your index files.
You can see how this works in the CB Folder Custom XML demo job included with the Folder connector. In this job, we have defined an index in Excel XML format.
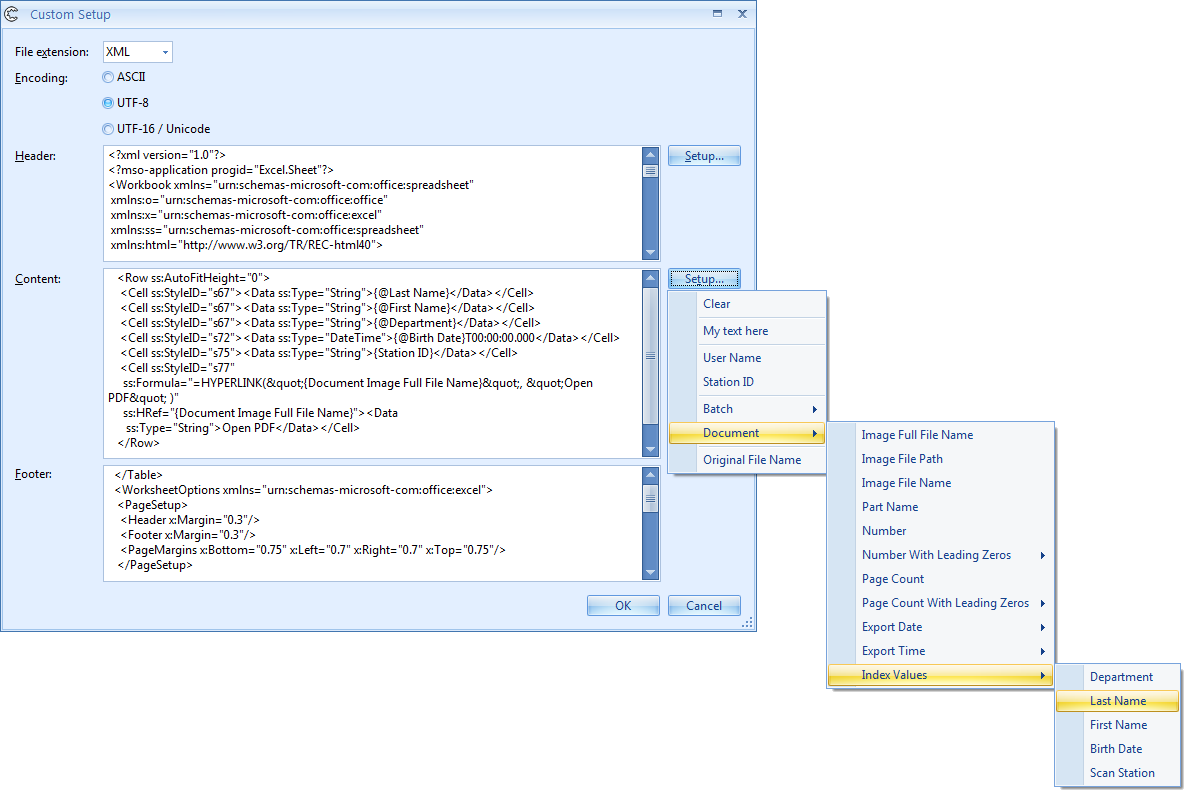
Then we saved the Excel sheet as XML.
An XML file always consists of a header, data and a footer section. We copied each section in the Folder connector’s custom setup panel and then replaced the fixed values with Kofax Express index values and variables.
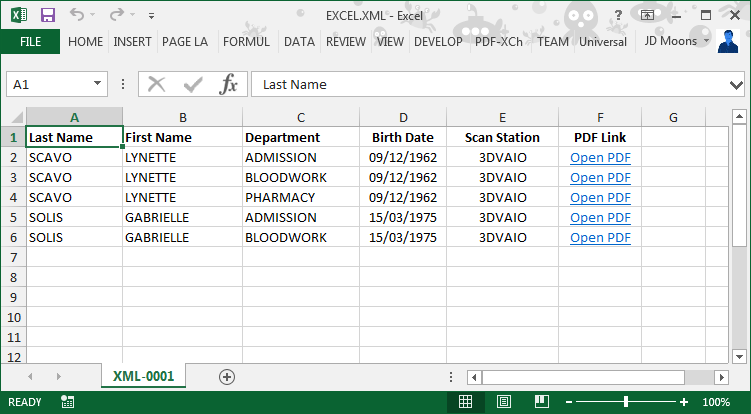 After export with the Folder connector, the
XML opens in Excel as a fully formatted sheet including hyperlinks, columns widths, bold headers etc.
Creating an XML File Compatible with M-Files
With the Folder Export Connector, you can create a custom XML file that is compatible with M-Files.
First, in M-Files, you create a new connection to an external file source in the M-Files Server Administrator. M-Files expects a PDF/XML file pair. The name of the files need to be identical. The xml file contains the metadata associated with the PDF file.
By default, M-Files expects XML files structured like this:
<?xml version="1.0" encoding="UTF-8"?>
<document>
 <patientname>L. Scavo</patientname>
 <doctype>Admission</doctype>
 <patientnr>123456789</patientnr>
</document>
Using this setup, the Folder Export Connector outputs a pair of PDF/XML files ready to be imported by your M-Files “Import Files Connection”.
For more information about importing PDF files with associated metadata into M-Files, please search the web for “Importing metadata from XML files to M-Files”.

 8. Custom TXT index files
vCards or electronic business cards are another example of a custom index files.
As you can see in the setup, a vCard is nothing else than a flat text file with specific tags and labels and a *.vcf file extension.
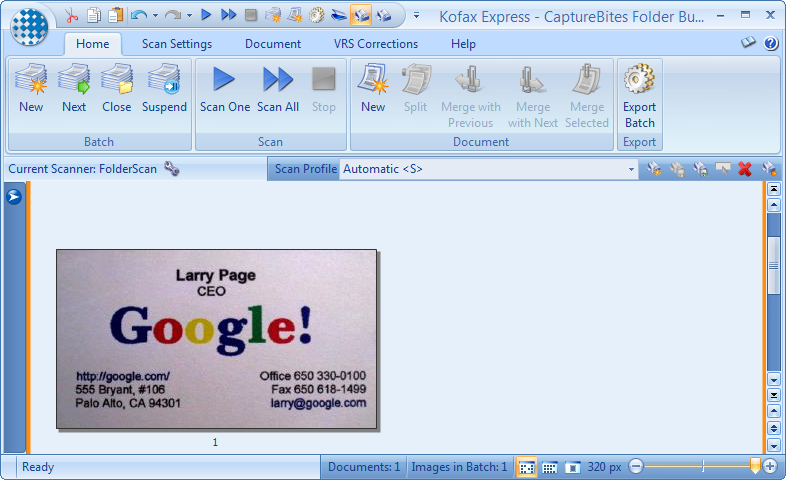 Using this custom document index format, you can easily generate *.vcf XML files with the Folder connector and turn an image like this…
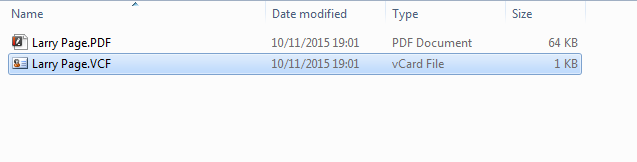 into a *vcf file like this.
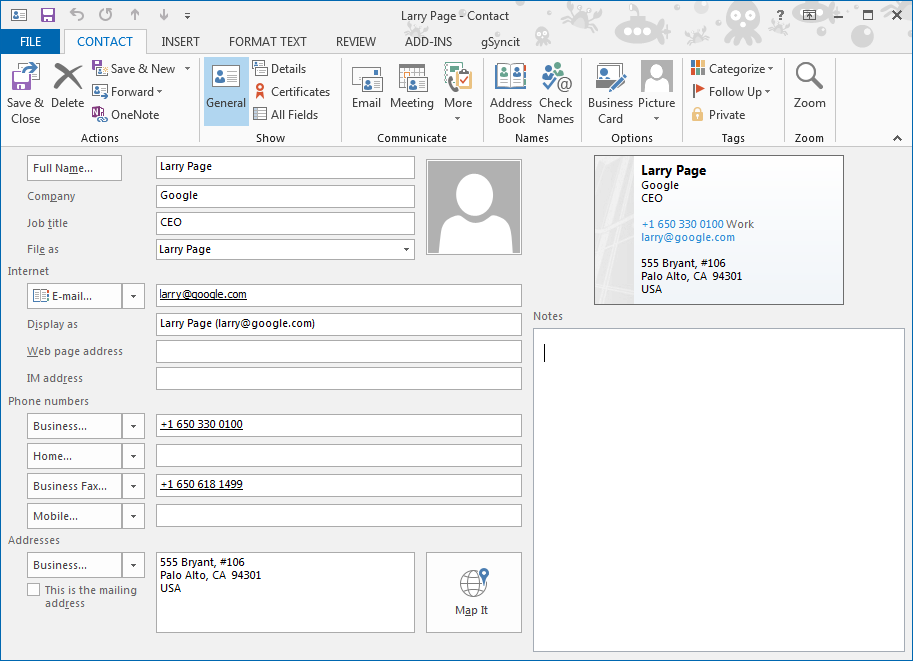 which opens in Outlook like this.
Obviously, you need to define the index fields marked in green in Kofax Express first. For example {@Company} corresponds with a Kofax Express index field named Company
BEGIN:VCARD
VERSION:4.0
N:{@Name};;;;
FN:{@Name}
ORG:{@Company}
TITLE:{@Title}
PHOTO;MEDIATYPE=image/gif:https://www.example.com/dir_photos/my_photo.gif
TEL;WORK;VOICE:{@Tel.}
TEL;CELL;VOICE:{@Mobile}
TEL;WORK;FAX:{@Fax}
ADR;TYPE=work;LABEL="{@Street, Number}\n{@City}, {@State} {@Postcode}\n{@Country}"
 :;;{@Street, Number};{@City};{@State};{@Postcode};{@Country}
EMAIL:{@Email}
REV:20080424T195243Z
END:VCARD
9. Output Searchable PDF or PDF/A
You can output PDF or PDF/A and make the PDF files searchable by enabling OCR.
2 Select the Folder connector and press the setup button
3 Select PDF as the file type and press Setup
4 Here you can decide whether you want to output standard PDF or PDF/A files.
5 Press Setup to enable OCR and generate Searchable PDF files.
6 Set desired OCR options. Options are self-explanatory

10. Output super compressed color PDF Files with the file size of black & white
Color scans look more realistic and represent your documents better showing all mark-ups, logos and highlights in their original color. However color scans are 10 to 20 times larger than black & white scans.
With the Kofax color super compression technology, you can generate color PDF files with the file size of black & white images!
2 Select PDF as the file type and press Setup
3 Select standard PDF or PDF/A files and press Setup to access super compression settings.
4 Set desired PDF super compression options
5 In the viewer on the left side, you see the original uncompressed image. In our example, the file size is 789 KB.
6 In the viewer on the right side, you see the super compressed image which is in our example 14 times smaller than the original (56 KB).
It even looks better than the original color image because the super compression feature has an option to snap the background to white to increase the readability.

11. PDF Custom Properties
You can embed Kofax Express index fields as custom properties in each exported PDF. Some document management systems, such as Liferay can search on these custom properties.
To embed custom properties in your PDF files, go to the Job Setup tab in Kofax Express and make sure the CaptureBites Folder Export connector is selected.
Open the Folder connector’s setup by pressing the setup button next to the selected Folder Connector.
Make sure to select PDF as the File type and press Setup next to the File type.

The PDF Setup opens. Here you can enable and configure PDF Custom Properties.

Check the boxes next to the index fields that you want to include as custom properties.
The PDF specifications have reserved some properties. Therefore, it is not allowed to use index fields labeled “Title, Author, Subject, Keywords, Creator, Producer, CreationDate, ModDate and Trapped” as custom properties. You can still define these in Kofax Express but they won’t show up in the PDF custom properties list.
The reserved properties are case sensitive. For example, “Subject” is not allowed but “subject” is.
After export, the easiest way to check the PDF custom properties is by opening the PDF file with Adobe Acrobat.
In Adobe Acrobat, select the File / Properties menu and open the Custom tab to display the custom properties.

Note: Some (non-Adobe) PDF readers do not display custom properties.
12. Split PDF to a Maximum File Size – Configuration
Go to the Job Setup tab in Kofax Express and make sure the CaptureBites Folder Export connector is selected.
Open the Folder connector’s setup by clicking on the small setup button next to the selected Folder Connector.
Make sure to select PDF as the File type and open the PDF setup by clicking Setup next to File type.
The PDF Setup opens. Here you can enable and configure PDF splitting.

![]() Format: First select the correct PDF format. You can select regular PDF or PDF/A. However be aware that after splitting PDF/A files will always be converted to regular PDF.
Format: First select the correct PDF format. You can select regular PDF or PDF/A. However be aware that after splitting PDF/A files will always be converted to regular PDF.
The main reason to select PDF/A is in combination with Super Compression and to increase overall speed to generate split PDF files. PDF/A with super compression will use standard JPG compression to compress color layers while regular PDF will use JPEG 2000 compression for color layers. Compressing color layers with standard JPG is faster than compressing with JPEG 2000. In other words, the fastest method to generate split regular PDF files is by selecting PDF/A here. Again, resulting PDF files after splitting will be always regular PDF with JPG or JPG 2000 compressed color layers depending on the PDF format selected here.
Password protected and bookmarked PDF files cannot be split.
Click on the Setup button next to the selected Format to configure Super Compression, OCR to generate Searchable PDF and to set PDF reader settings.
![]() Maximum file size: Set the maximum file size of exported PDF files. When a PDF file exceeds the maximum file size, PDF files will be split in the most optimal way. That means that each PDF part will contain the maximum possible number of pages that fits in the maximum file size. The CaptureBites Folder connector uses the same calculation as the Windows operating system to convert KiloBytes to Bytes. 1000 KB = 1000 x 1024 Bytes = 1’024’000 Bytes.
Maximum file size: Set the maximum file size of exported PDF files. When a PDF file exceeds the maximum file size, PDF files will be split in the most optimal way. That means that each PDF part will contain the maximum possible number of pages that fits in the maximum file size. The CaptureBites Folder connector uses the same calculation as the Windows operating system to convert KiloBytes to Bytes. 1000 KB = 1000 x 1024 Bytes = 1’024’000 Bytes.
![]() Part name: Define the Part name here. You can combine any fixed text and information about the part as desired. The defined Part name can then by used in the Document File name in the Folder setup screen. Thanks to this approach, it is possible to suppress the complete Part name in the File name if the whole document fits in the Maximum file size and does not need to be split. See topic 4 below.
Part name: Define the Part name here. You can combine any fixed text and information about the part as desired. The defined Part name can then by used in the Document File name in the Folder setup screen. Thanks to this approach, it is possible to suppress the complete Part name in the File name if the whole document fits in the Maximum file size and does not need to be split. See topic 4 below.
Following part information, with or without leading zeros, can be used in the Part name:
- Part Number: Each part has a sequential number starting with 1 for the first part, then incremented with 1 for each additional part.
- Part Count: The total number of parts for a given document
- Part First Page: The first page in the part as it relates to its position in the original document
- Part Last Page: The last page in the part as it relates to its position in the original document
- Part Page Count: The total number of pages in a given part
A document of 125 pages is split in 5 parts with a maximum size of 5000 KB
Defined Part Name
_Part_{Part Number With Zeros[2]}_of {Part Count With Zeros[2]}_Page_{Part First Page With Zeros[3]}_to_{Part Last Page With Zeros[3]}_Total_Pages_in_Part_{Part Page Count With Zeros[3]}
Part names after splitting will be
_Part_01_of_05_Page_001_to_028_Total_Pages_in_Part_028   (4980_KB)
_Part_02_of_05_Page_029_to_055_Total_Pages_in_Part_027   (4855_KB)
_Part_03_of_05_Page_056_to_085_Total_Pages_in_Part_030   (4995_KB)
_Part_04_of_05_Page_086_to_112_Total_Pages_in_Part_027   (4832_KB)
_Part_05_of_05_Page_113_to_125_Total_Pages_in_Part_013   (2395_KB)
After you have defined the Part name, close the PDF setup window and use the {Part Name} variable in your Document File name definition.

Example
- “Clear part name if document is not split” is enabled
- Maximum size is set to 5000 KB
- Document 1 (see example above) consists of 125 pages and will be split in 5 parts
- Document 2 consists of 25 pages and stays below 5000 KB and does not need to be split
- Document 3 consists of 58 pages and will be split in 2 parts
Defined File Name
{Document Number With Zeros[8]}{Part Name}{File Type Extension}
Document File names after splitting will be
00000001_Part_01_of_05_Page_001_to_028_Total_Pages_in_Part_028.PDF   (4980_KB)
00000001_Part_02_of_05_Page_029_to_055_Total_Pages_in_Part_027.PDF   (4855_KB)
00000001_Part_03_of_05_Page_056_to_085_Total_Pages_in_Part_030.PDF   (4995_KB)
00000001_Part_04_of_05_Page_086_to_112_Total_Pages_in_Part_027.PDF   (4832_KB)
00000001_Part_05_of_05_Page_113_to_125_Total_Pages_in_Part_013.PDF   (2395_KB)
00000002.PDF (4887_KB)
00000003_Part_01_of_02_Page_001_to_030_Total_Pages_in_Part_030.PDF   (5000_KB)
00000003_Part_02_of_02_Page_031_to_058_Total_Pages_in_Part_028.PDF   (4899_KB)
Note: Since document 2 was not split in parts, the complete part element was suppressed from the file name. If you disable the “Clear part name if document is not split” option. The file name of document 2 would be:
00000002_Part_01_of_01_Page_001_to_025_Total_Pages_in_Part_025.PDF
![]() Clear part name if document is not split: When you enable this option, the part name will be automatically excluded from the file name if the complete document fits in a single file and no splitting is required. All elements, both fixed and variable, as defined in the part name (see topic 3) will be cleared.
Clear part name if document is not split: When you enable this option, the part name will be automatically excluded from the file name if the complete document fits in a single file and no splitting is required. All elements, both fixed and variable, as defined in the part name (see topic 3) will be cleared.
Index files of split PDF files
Each part will generate a line in the document and batch index files. You define index files from the main CaptureBites Folder Setup panel.

- To include detailed information about each part, you need to open the Setup of the Batch or Document index files.
- Select “User defined” and include the desired part information by selecting it from the drop down box
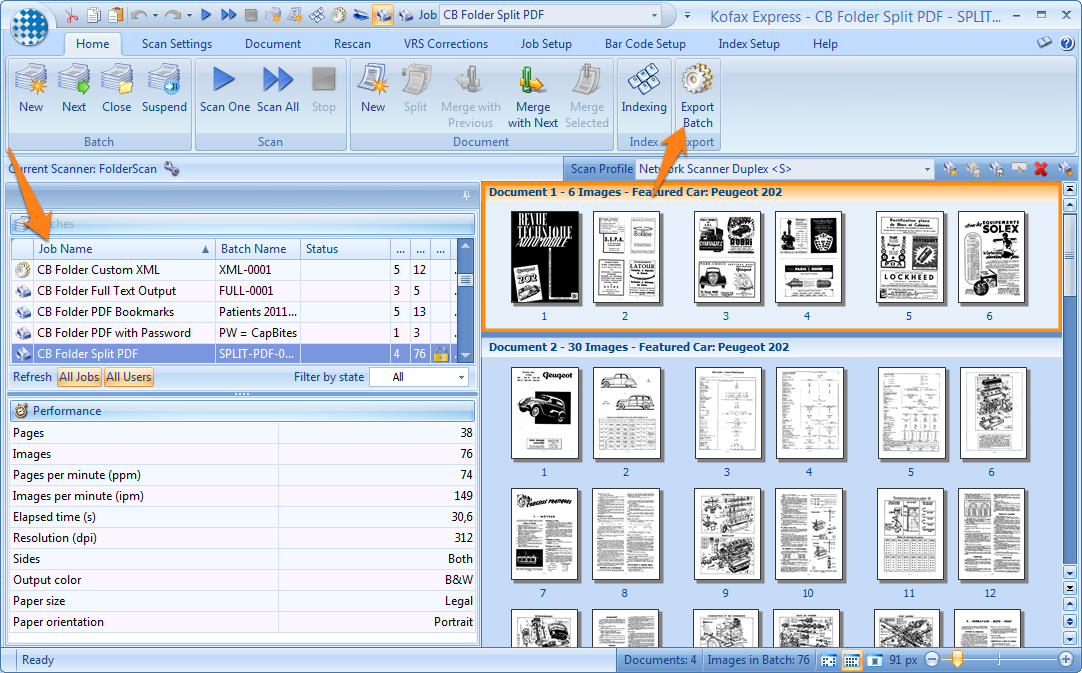
13. Bookmarked PDF Files
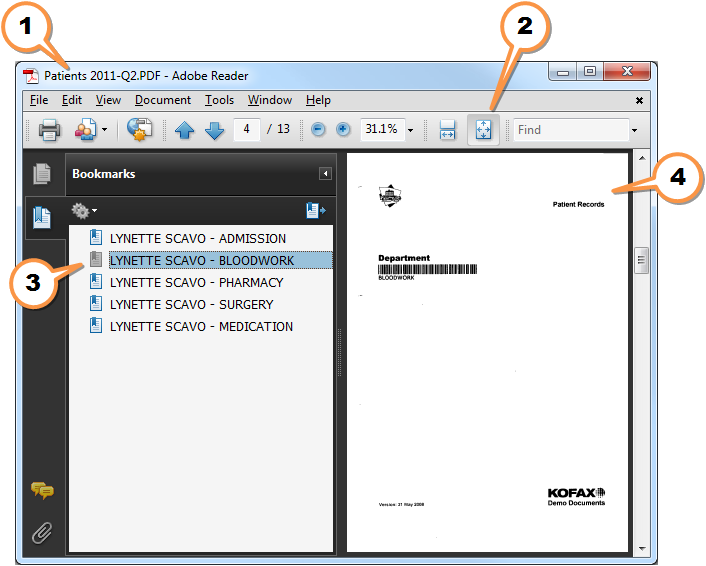
With the CaptureBites Folder connector you can export a complete Kofax Express Batch to a single bookmarked PDF file.
For example, if you have a patient record consisting of many sub sections, like Admission, Bloodwork, Pharmacy, Medication, Surgery etc., you can create a batch with, for each section, a document in Kofax Express. Screen shot below shows how such batch would look like in Kofax Express.

In the CaptureBites Folder connector PDF settings, you just need to select Create PDF per Batch and define which document index field you want to use to define the names of your bookmarks. In this case we used the Department index field to define the Bookmarks.

For this demo, we also predefined the Adobe Reader settings to open the PDF with the bookmark panel open and the images displayed in “Fit to Page” mode. The resulting PDF can be downloaded from here. In case you are browsing with Chrome, the embedded PDF Chrome viewer will not show the bookmarks. Just click Yes next to “Open in Adobe Reader?” to see the bookmarks.
14. Configuring Password Protected PDF files
When you select “Password Protected PDF” as the file type, you can configure password protection through the Setup button next to the file type drop down box.

For more information about an option, just hover over the information icon ![]() to reveal more details about the option.
to reveal more details about the option.

Document Open Password
To create non-protected and fully accessible PDF files, just leave both passwords empty.
If you only enter the Open Password, anyone who wants to open the PDF in a viewer will require this password. The PDF’s content will also be encrypted.
Permissions Password
If you only enter the Permissions Password, you can allow or disallow certain functions such as printing, changing, copying, etc. You won’t need the password to open the PDF but certain menu options and features will be disabled in the Adobe reader related to the disallowed permissions. All Adobe products enforce the defined restrictions. But some non-Adobe products do not fully support and respect these settings. Please be aware that you may be able to bypass some of the restrictions using such products.
About PDF permissions…
| Permission | Description |
| Printing | Disallow printing or only allow printing in low resolution (up to 150 dpi). Allow printing in any resolution by selecting High Res. |
| Changing the Document | Disallow or allow following functions: replacing pages, cropping pages, page transitions (these are used for slide show effects when PDF reader is used in full screen mode), changing the page numbering schema and setting actions when opening or closing a page. |
| Commenting | Disallow or allow following functions: sticky notes, stamping, highlighting, underlining, cross out, writing with the pencil tool, audio commenting, drawing objects such as callouts, text boxes, arrows, lines etc. |
| Form Field Fill-in or Signing | Disallow or allow following functions: fill in forms and add digital signatures. The fill in forms option is currently not relevant because the CaptureBites Folder connector cannot generate PDF forms. |
| Document Assembly | Document assembly is related to combining 2 or more PDF files into a single PDF file. If this function is disallowed, the user will require the permissions password to be able to combine one or more PDF files into a single PDF file. |
| Content Copying | Disallow or allow copying parts of pages or complete pages. When disallowed, the copy and cut functions will be grayed out in Adobe reader. |
| Content Accessibility Enabled | Allow this option if your PDF files need to be accessible by people with disabilities such as mobility impairments, blindness, and low vision. |
When you open a PDF with limited permissions in Adobe Reader, you can see the restrictions, by selecting the File – Properties menu. This opens the PDF Document Properties panel.

The Permissions Password can be used in the full Adobe Acrobat or equivalent product to change the permissions.
Combining both passwords makes it possible to set a password to open the PDF and also set restrictions to disallow certain functions such as printing and copying.
15. PDF Reader Settings
With the CaptureBites Folder connector you can define precisely how your PDF files open in the Adobe Reader. Some, non-Adobe readers, like the Foxit PDF reader also supports these options.

![]() Define the zoom setting when the reader opens. In the example above, we defined Fit Page as the zoom setting.
Define the zoom setting when the reader opens. In the example above, we defined Fit Page as the zoom setting.
![]() Define whether the left pane should be expanded or closed when opening the PDF. You can also define whether the bookmark or thumbnail pane should be displayed.
Define whether the left pane should be expanded or closed when opening the PDF. You can also define whether the bookmark or thumbnail pane should be displayed.
![]() Define the Page Layout when the viewer opens. You can define one or 2 pages facing, continuous or page by page navigation.
Define the Page Layout when the viewer opens. You can define one or 2 pages facing, continuous or page by page navigation.
16. Full text output of your scanned pages
Next to PDF and TIFF files, you can also generate full text output for each scanned page. You have the choice to generate a text file per page or per document. You can then use the text file to feed a full text indexing system or extract specific data from it.
Original Image

Full Text Output

Full Text Output Setup
Open the Folder connector’s setup in the Kofax Express Job tab.
Enable the full text option in the Folder setup and press setup to configure the full text output.


17. Uncompressed or LZW compressed TIFF files
Sometimes you want the best image quality and save your files as uncompressed TIFF files or LZW compressed TIFF files. LZW reduces the file size with 50% without loss of image quality.
For even better quality scan in one or more resolution steps higher than your desired output. During export we scale the image down to the desired output resolution resulting in super high quality images.


18. Backup image files
This option allows to select a folder to copy a duplicate of all exported document files. During export it will generate a backup of all your documents to an external drive or backup server. All this during a single export.
If you generate Searchable PDF files, which is a process that takes some time, the PDF files will only be generated once and then a straightforward copy will be performed to the backup folder which is considerably more efficient than exporting the same batch to two destinations.

19. Your suggestions are welcome!
Share with us your ideas about how to use the CaptureBites Folder Connector or let us know how to improve it by clicking here.
