AutoBites > Help
AutoBites – Help
1. Overview
Combined with Kofax Express, AutoBites™ automates the import, processing and export of document images. Documents can automatically be delivered to a folder structure, document management system, database or email inbox of choice.
IMPORTANT: Due to technical limitations, AutoBites and the Commander Tool are only compatible with Kofax Express version 3.1 and 3.2. If it’s critical to use Kofax Express version 3.3, we highly recommend to use MetaServer instead.

- Send PDF, TIF, JPG or BMP files to watched folders from a wide range of devices.
- If it can scan to a folder it can be automated!
- Convert existing image archives to a format and structure of choice
- AutoBites watches folders and its sub folders continuously.
- You can use sub folder and file names for indexing
- Some devices can pair XML data with each document containing index data entered on the device’s panel or user metadata. This data can be transferred to Kofax Express for document indexing.
- A sub folder can be linked to a Kofax Express job for automatic job switching
- As soon as images arrive AutoBites and Kofax Express automatically perform:
- VRS Processing (Auto-Rotate, Crop, Deskew, Punch Hole Removal, Faint Text Enhancement, Background Removal and Auto-Delete Blanks)
- Automatic Document Separation
- Color Super Compression
- Indexing based on bar codes, folder names, file names, xml metadata
- Automatic Export to Multiple Destinations
- To Email, Folder Structure, FTP/SFTP/FTPS Server, Database
- To SharePoint, Alfresco, DocuShare, or other DMS
- Send one or more export destinations in a variety of file formats (TIF, Searchable PDF or PDF/A, etc.) using the CaptureBites Multi Export connector.
Watch a 5 minute movie to learn about AutoBites and how it can be used with network scanners.
2. How does AutoBites work?
AutoBites automates the import of files from watched folders and sub folders into Kofax Express and automatically triggers the export of batches of imported files.
It actually makes the processing of files with Kofax Express fully automatic.
In the AutoBites setup, you just select the Kofax Express job that you want to automate. You also define how to create documents and when a batch needs to be exported.
AutoBites features two document creation methods:
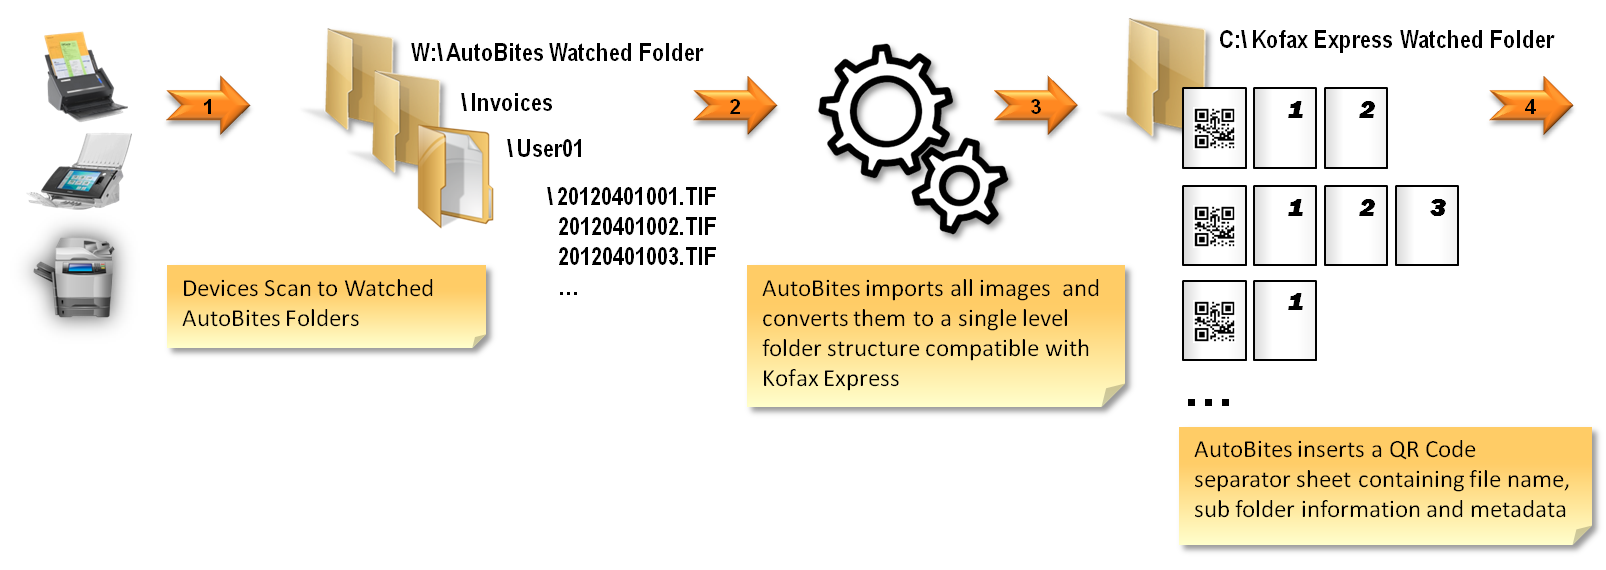
Method 1: AutoBites handles document creation and creates a document for every incoming file
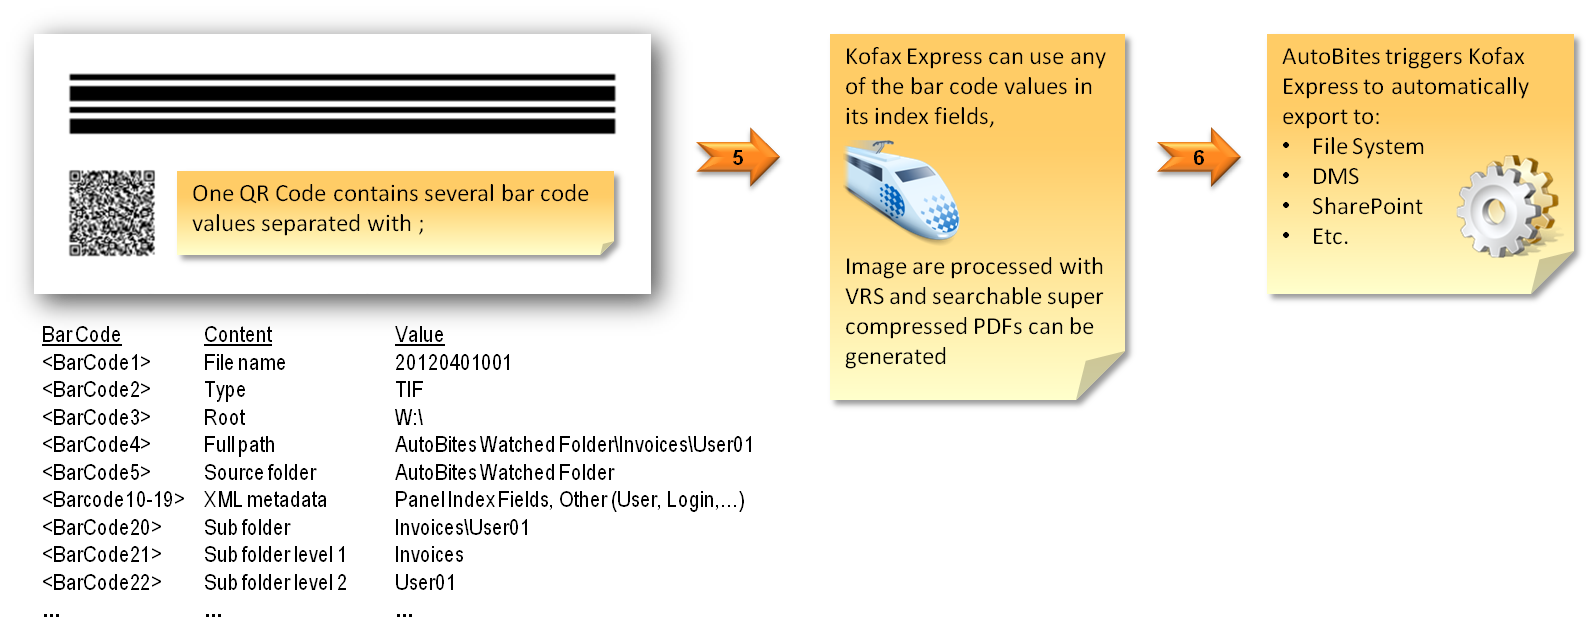
When AutoBites detects one or more files (PDF, TIF, JPG or BMP) it generates a separator sheet for each file. The separator sheet contains a patch code and a QR code with all the information related to the file such as original file name, extension, path, sub folders etc. The data contained in a paired XML file (an XML file with the same name as the document file) can also be stored in the QR code.
Next, AutoBites moves the files with their separator sheet to the Kofax Express watched folder. Kofax Express detects the patch code on the AutoBites separator sheet and correctly separates the documents.
Kofax Express also detects and reads the QR code to populate index fields with information about the original file such as file name, extension, original sub folder name and data contained in the paired XML file.
As soon as Kofax Express has finished processing the imported documents, they are automatically exported to a destination of choice.
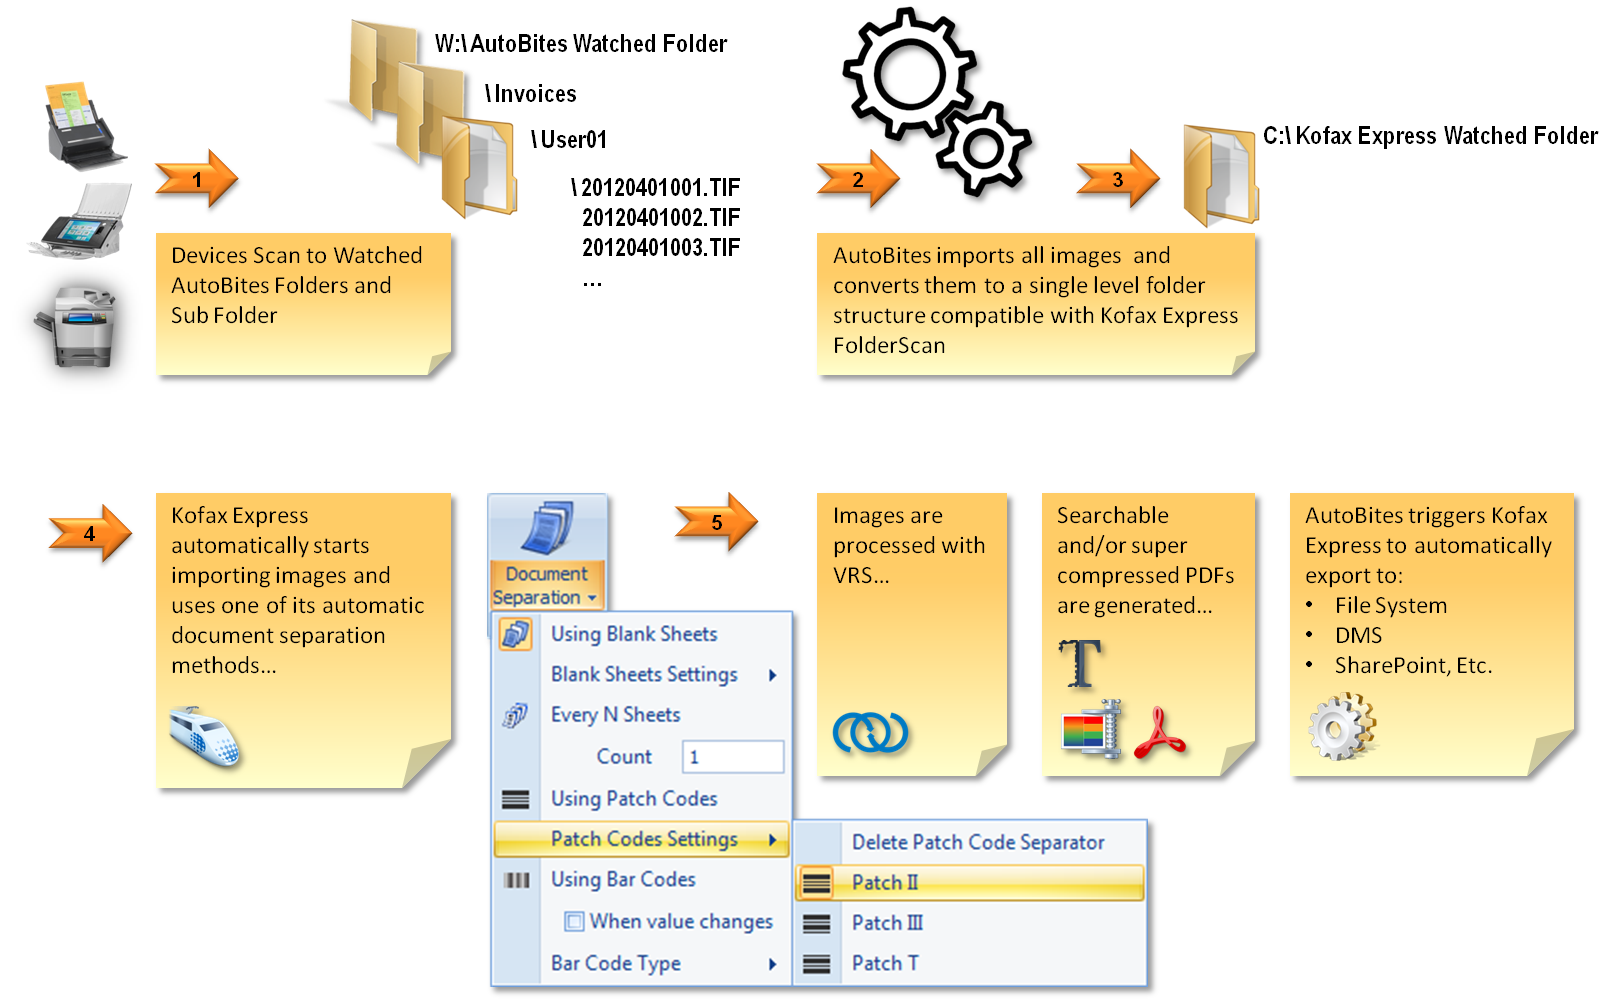
Method 2: Kofax Express handles document creation and uses its own methods for document separation (default method)
In this mode, AutoBites will not generate the QR Code page and will leave it to Kofax Express to use one of its methods for automatic document separation such as:
- Counting (every 1 page for example)
- Start a new document for every incoming file
- Separate on bar code or patch code
- Separate when a blank page is detected
Below diagrams show visually how images are processed with AutoBites and Kofax Express.
Important
When Kofax Express handles document creation, the AutoBites separator sheet with QR Code will not be generated and therefore file and folder information and xml metadata cannot be passed to Kofax Express.
AutoBites Handles Document Creation
Kofax Express Handles Document Creation
3. Installation
- If you haven’t installed Kofax Express yet, you can download and install the demo version here.
IMPORTANT: AutoBites is only compatible with Kofax Express version 3.1 and 3.2. It is not compatible with Kofax Express version 3.3.
- Next, download and install AutoBites from here.
NOTE: AutoBites only works in demo mode when Kofax Express is also in demo mode. If you want to test AutoBites with a production license of Kofax Express, please request an AutoBites time trial license by sending us an email. Click here to send a request for an AutoBites time trial now.
- After installation, you will find the AutoBites icon on your desktop.
4. Running the AutoBites Demo
To familiarize yourself with AutoBites we recommend to run the AutoBites demo job first.
- To run the demo job, don’t change anything to the AutoBites configuration. It comes pre-configured for the demo. Launch AutoBites.

- Click on the green start button.

- Wait until AutoBites has launched Kofax Express completely. AutoBites will indicate “Waiting for files with valid extensions…” in the activity list and the AutoBites gears will start turning. All is controlled by AutoBites and there is no need to interact with Kofax Express.

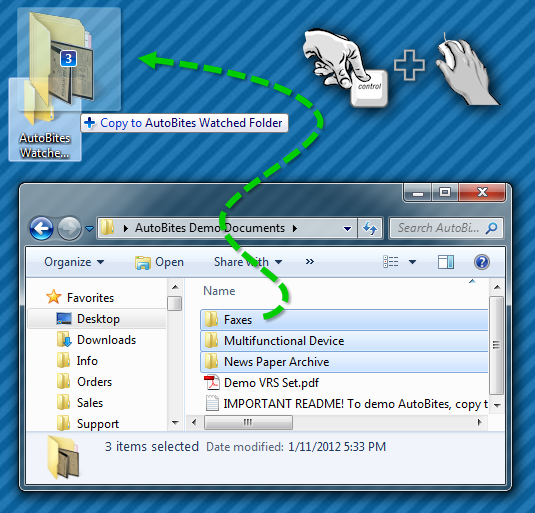
- Copy (don’t move) the folders and files in the “AutoBites Demo Documents” folder to the “AutoBites Watched Folder” on your desktop. You can easily copy the folders by holding the Control key down and dragging the folders to the “AutoBites Watched Folder”. By copying, you keep the original folders available for the next demo.
Tip
If you move or delete the demo documents by accident, you can find an identical set of documents in the “AutoBites Demo Documents Backup” folder on your desktop. If you also delete those, reinstall AutoBites to restore the Demo Documents folder completely.
AutoBites will detect the incoming images and following actions will happen completely automatically:
- All documents are imported in Kofax Express
- Documents are separated based on the Patch T code on the AutoBites separator sheet
- All images are processed with VRS and are auto-rotated
- When 8 documents are processed or if no more documents arrive for 5 seconds, Kofax Express exports the batch to the “CaptureBites after Export\AutoBites” folder on your desktop
- During export, all documents are super-compressed and converted to searchable PDF files
- The converted documents after export are organized in exactly the same folder structure as they were originally organized in the “AutoBites Watched Folder”. The name of the files is also exactly the same as the source files. Only the extension changes to PDF.
- You do not need to interact with Kofax Express at all. All prior steps occur completely automatically.
- When all files have been processed, AutoBites continues waiting for new files. The AutoBites activity list displays the message “Waiting for files with valid extensions in source folder”. Just copy some more files in the “AutoBites Watched Folder” to have them automatically processed.
Stopping AutoBites will also stop Kofax Express.
Closing AutoBites will close Kofax Express. After closing AutoBites, AutoBites will shut down Kofax Express gracefully and therefore needs to export all Kofax Express batches scheduled for export.
Consequently if you have many batches scheduled for export, stopping the AutoBites process may take several minutes.

To resume automatic processing, press the AutoBites start button.
5. Activation
AutoBites detects when Kofax Express runs in demonstration mode and will also switch to demo mode. In demo mode, images will be stamped with a demo seal.
When you have a production license of Kofax Express, you can request a quotation for a matching production license for AutoBites.
If you want to test AutoBites with a production license of Kofax Express, please request an AutoBites time trial license by sending us an email. Click here to send a request for an AutoBites time trial now.
If you are not sure where to find your Kofax Express license information, please navigate to this page.
Once you have received your activation code, start AutoBites and click the Setup button.

Click Activate. This will open the AutoBites activation panel. Enter your unique Activation Code and click OK.

6. Configuring AutoBites consists of the following steps:
- Start Kofax Express and define a Kofax Express FolderScan Job
- Start and configure AutoBites
- Start the AutoBites process and test
Important
We assume you already have installed Kofax Express 3.1 and AutoBites and are familiar how to run it in demo mode. If not, see instructions in the “Installation and Running the Demo” sections first.
If you are not familiar with Kofax Express, but quickly want to know whether your needs can be addressed with AutoBites and Kofax Express, feel free to contact us.
Based on your requirements we are glad to help out. If you can share some sample images we can also send you a pre-defined AutoBites and Kofax Express job performing the desired functions for your evaluation. No strings attached, it’s just another way to show you how powerful AutoBites is.
If you are new to AutoBites, we recommend to familiarize yourself with the concept and AutoBites demonstration first by going through the 4 first sections of this AutoBites help.
7. Setting up Kofax Express
Define a Kofax Express job based on the AutoBites demo job (recommended)
The easiest way to configure a new job to be used with AutoBites is by copying the AutoBites demo job as another job under another name. Then modify this duplicated job.
To copy the AutoBites demo job, do the following:
- Start Kofax Express.
- Open the AutoBites job in Kofax Express
- Click the Round Kofax button and select Save/Save Job As

- Give the copied job a new name, click Save and modify the job settings to match your requirements.
- Close Kofax Express
- Start AutoBites
- Select your new Kofax Express Job through the AutoBites destination settings
- Click on the green Play button in AutoBites to start the process
- Copy some images in the AutoBites watched folder to test
Define a Kofax Express job from scratch
This section explains all AutoBites related Kofax Express job settings in detail.
AutoBites relies on a feature in Kofax Express called FolderScan. FolderScan is a powerful function to import document images instead of using a connected scanner.
The source of the images can be an existing image archive, a networked scanner or multi-functional device, a fax server, a Dropbox folder, a device that does not have scanner drivers such as a smart phone camera, a ScanSnap scanner, a book scanner, etc.
AutoBites Feedback
 AutoBites will verify if all job settings are correctly defined before starting and will indicate in the AutoBites activity list which settings are incorrectly set.
This makes it very easy to diagnose any issues and correct them in the Kofax Express Job you want to automate.
For example, the screen on the right side, is the feedback you get when you start a Job that is not correctly configured for AutoBites.
7 issues are reported and it’s just a matter of correcting them in Kofax Express to get up and running.
These are the critical Kofax Express settings…
FolderScan: In Kofax Express, you can select FolderScan with the Select Scanner button in the Quick Access tool bar. Once selected, you can configure FolderScan by clicking on the wrench key in the “Current Scanner” bar (see below).

Make sure you use following FolderScan settings:

IMPORTANT: The difference between the AutoBites watched folder and the FolderScan folder.
The watched folder can be any folder accessible by Kofax Express and is typically a folder on your local C drive.
THE FOLDERSCAN FOLDER IS NOT THE FOLDER YOU PLACE IMAGES IN TO BE PROCESSED!
If in doubt, just select c:\capturebites\express\folderscan\autobites as the FolderScan folder in Kofax Express.
AutoBites has its own watched folder and this is the folder you place files in to be processed. This folder should never be the same as the FolderScan folder defined in Kofax Express.
So your original images will need to be copied in the AutoBites watched folder (configured in AutoBites). AutoBites will take care of sending them to the FolderScan folder.
Scanner and Job Settings: Some scanner and job settings are important to make AutoBites function correctly. All these are already correctly set if you use a copy of the AutoBites demo job as a basis:
- In the Scan Settings Tab, select “One Side” scanning*:

- If you want to use the original file name, original file path or any of the sub folder names in Kofax Express index fields, you need to select QR-Code as one of the bar code types to detect in the Bar Code Setup Tab. You can of course detect additional bar code types as well in case you want to read bar codes from the imported documents.

- In the Job Setup tab, enable Patch T separation, enable Delete first page*; enable Delete batch after export*, disable Create new batch after export* and enable Background export*.
 Do not enable the “Delete Patch Code Separator” function, because this function will prevent Kofax Express to read the QR Code from the AutoBites separator sheet.
The separator sheet is removed during export by means of the “Delete first page” function.
8. Setting up AutoBites
In AutoBites, you basically need to select the watched folder and which Kofax Express job you want to automate.
You can keep the defaults for any of the other settings in most of the cases.
9. Description of all AutoBites settings
Start AutoBites and click on the Setup button to open the AutoBites settings.
9.1 AutoBites General Settings
 Test mode: When you are configuring AutoBites and Kofax Express it is useful to check whether index fields in Kofax Express are populated correctly.
In normal mode, documents are automatically exported by Kofax Express and there is no opportunity to check the index values when the documents are still in Kofax Express.
In Test mode, documents are not automatically exported and stay in Kofax Express to help fine tune the configuration.
When you start AutoBites in test mode, it will display a warning.
 Auto Job-Switching: If you select “Auto Job-Switching” as the Job, then Kofax Express will automatically switch to the Job with the same name as the sub folder in which images arrive.
Make sure that the sub folder names exactly match the Kofax Express Job names.
9.2 AutoBites Source Settings
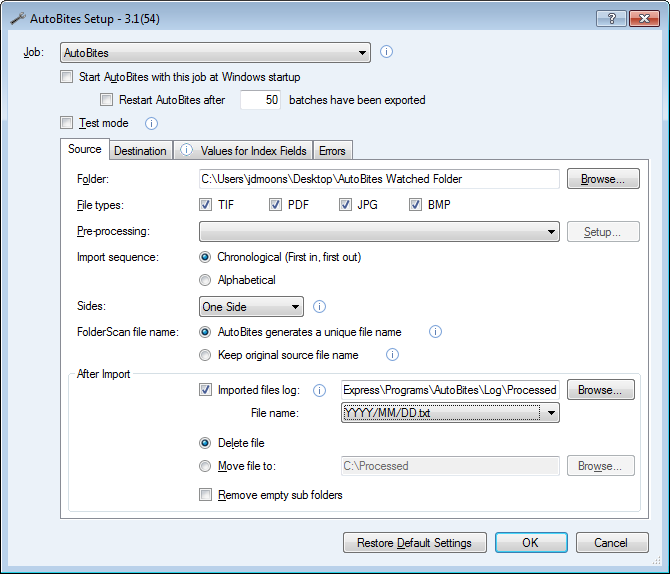
Source folder: This is the folder that will be watched by AutoBites. AutoBites can detect files in an unlimited number of sub folders in the source folder. You can select a folder on a drive or on a server using UNC paths.
File types: Check the File types you want to import. Unchecked file types will be ignored. The TIF file type accepts files with a TIF or TIFF extension, JPG accepts JPG or JPEG extensions. Extensions are not case sensitive. For example both JPG and jpg extensions are accepted when the JPG file type is selected. PDF files can be electronic (text based) or image based or a mixture of both. AutoBites will import all pages of multi page TIF and PDF files. AutoBites accepts both color and black & white images or any combination. Folders can contain a combination of file types.
Pre-processing: These are used to activate plug-in pre-processing functions. For example a plug-in to split large multi-page PDF files into single page JPG files for more efficient processing by Kofax Express or pre-process microfilm images to optimize them before sending them to Kofax Express and handle them with VRS.
Import sequence:
1) Chronological (First in, first out): Image files are imported in chronological sequence. Oldest image files first.
2) Alphabetical: Images are imported by file name in alphabetical order.
Sides: Select “Both Sides” when your source images always come in pairs: One front and once back side image per sheet.
IMPORTANT: In “Both Sides” mode, blank back sides always need to be included as well!
FolderScan file name:
1) AutoBites generates a unique file name: AutoBites converts the imported subfolder structure to a flat file structure and sends this flat file structure to FolderScan in order to process it with Kofax Express. Because files with duplicate names can reside in the subfolders, AutoBites names each file uniquely before delivering it in the FolderScan flat file structure.
2) Keep original source file name: This makes it possible to have AutoBites pass the original source file name generated by the source device to the FolderScan folder.
In that way you can create files like <Original Scan Date>-<Page Sequence Number>.TIF with your scan source and pass these files to AutoBites. You can then make use of the {Original File Name} system value in Kofax Express to create export folders etc.
To split the {Original File Name} in segments, you can make use of the CaptureBites MetaTool.
Imported files log: When enabled, AutoBites logs all the original file names of the imported files, their date & time when they were imported, their output file names (the name as it was sent to FolderScan) and the Kofax Express job with which they will be processed.
One log file in txt format will be generated per day. For example the log file of the 29th of July 2013 will be called \2013\07\29.txt and placed in the specified log folder.
For each imported image, the following information will be logged:
- Column1: Date and Time of Import
- Column2: Original file name and subfolder(s) of the imported file
- Column3: Kofax Express Job used
- Column4: The file number after pre-processing of the input file
- Column5: The output file name as sent to FolderScan. This would be the same as the input file name if the “Keep original source file name” option is enabled.”
Processed files can be deleted or kept depending on the following options:
1) Delete file: All processed files will be deleted to avoid that they are processes twice.
2) Move file to: All processed files will be moved from the AutoBites watched folder to the specified folder.
Remove empty sub folders: Check this option when you want AutoBites to remove empty sub folders as soon as all documents are imported from those folders. When AutoBites is in Auto-Job-Switching Mode, the sub folders per job will not be affected by this setting and will not be deleted even if they are empty.
9.3 AutoBites Destination Settings
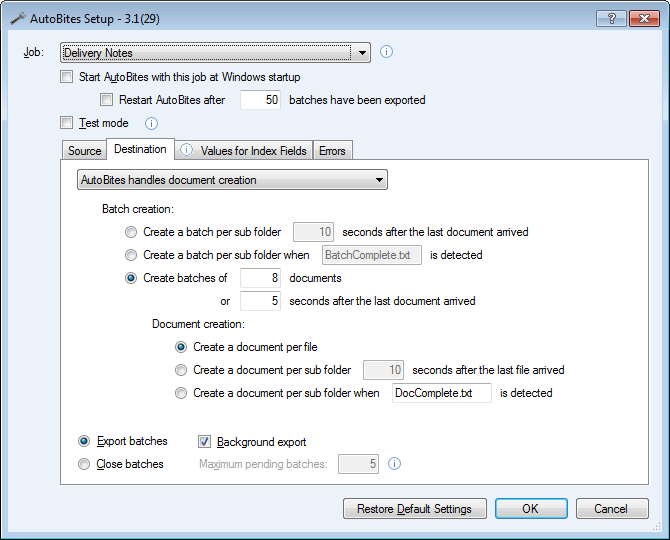
AutoBites handles Document Creation (default) / Kofax Express handles Document Creation: Select the document creation method you want to use. For a detailed explanation of the two methods, please read the “How does AutoBites work?” section on this page.
- AutoBites handles Document Creation: Select this option if you want AutoBites to generate a separator sheet. The separator sheet will include a Patch T Code and a QR code containing important information about each imported file. The information in the bar code is described in the “Values for Index Fields” tab to help map the bar code values with your Kofax Express fields.
- Kofax Express handles Document Creation: Select this option if you do not want AutoBites to create a separator sheet and use one of the Kofax Express separation methods instead.
Batch Creation Settings
- Create a batch per sub folder X seconds after the last document arrived: Typically used when the complete content of a sub folder has to stay together in a single Kofax Express batch. For example all sub sections of a single patient record. The batch will be considered complete if no more documents arrived after x seconds. Use this option only if you cannot use the more robust next option with trigger file.
- Create a batch per sub folder when ZZZZZZ.WWW is detected: Typically used when the complete content of a sub folder has to stay together in a single Kofax Express batch. For example all sub sections of a single patient record. Using a trigger file is a more robust method compared with a timer trigger described in the previous option. The batch will be considered complete as soon as a file with the defined name is detected.
- Create batches of Y documents or X seconds after the last document arrived (default): AutoBites will trigger an automatic export after Kofax Express has received Y documents in a batch. If you want to export each incoming document instantly, set this value to 1. If you have a high volume of documents to process (like a large conversion job), increase this value. Kofax Express makes better use of multiple processors and exports more efficiently when processing batches of 8 documents and higher. It is not recommended to create gigantic batches either, because stopping the AutoBites process requires batches to be fully exported. So the more documents in a batch, the longer it will take to stop AutoBites. As a general guideline this value should be between 1 and 50. If you’re not sure, keep the default value. Even if the number of documents specified in the above setting is not reached, AutoBites will trigger an export after X seconds. This timer optimizes the work load of Kofax Express. During peak periods, batches with the maximum number of documents will be created for maximum processing efficiency. During slow periods when only few documents come in, documents won’t be stuck in the process and will be exported regardless of the number of files defined above. If you’re not sure what to set here, keep the default values.
Document Creation Settings
- Create a document per file: Every incoming file will be considered as a separate document in Kofax Express.
- Create a document per sub folder X seconds after the last file arrived: Typically used with JPG files or single page TIF files organized in a sub folder per document. If you want to consider all files in such subfolder as a single multi-page document, select this option. You would typically use the subfolder name as the name of the document in your Kofax Express export settings when you use this function. The subfolder is considered complete if X seconds have passed without any new files coming in.
- Create a document per sub folder when ZZZZZZ.WWW is detected: Typically used with JPG files or single page TIF files organized in a sub folder per document. If you want to consider all files in such sub folder as a single multi-page document, select this option. The document will be considered complete as soon as a file with the defined name is detected.
Export batches: Select this option if you want AutoBites to automatically export batches. The moment when a batch is considered ready to be exported is determined by the Batch creation options in this tab. See above.
Background export: Enable this option to take advantage of Kofax Express background export feature. Batches will be submitted to Kofax Express for processing while another batch is being exported in parallel. Disabling the option will force AutoBites to wait until Kofax Express has completely finished exporting a batch before submitting a new one for processing.
Close batches: If you combine AutoBites with a Kofax Express server and several indexing clients, then it makes sense to have AutoBites just close the batches after import. Closed batches become automatically available for the indexing clients.
Maximum pending batches N: To keep the number of pending batches limited in Kofax Express, set this value to the desired number. For large volumes of images, you can point the AutoBites source folder to the folder containing all the images. It will stop importing automatically when it reaches the set number and proceed importing again when the number of pending batches is smaller than the set limit.
9.4 Values for Index Fields
This tab is only relevant if “AutoBites handles document creation” is selected in the Destination tab.
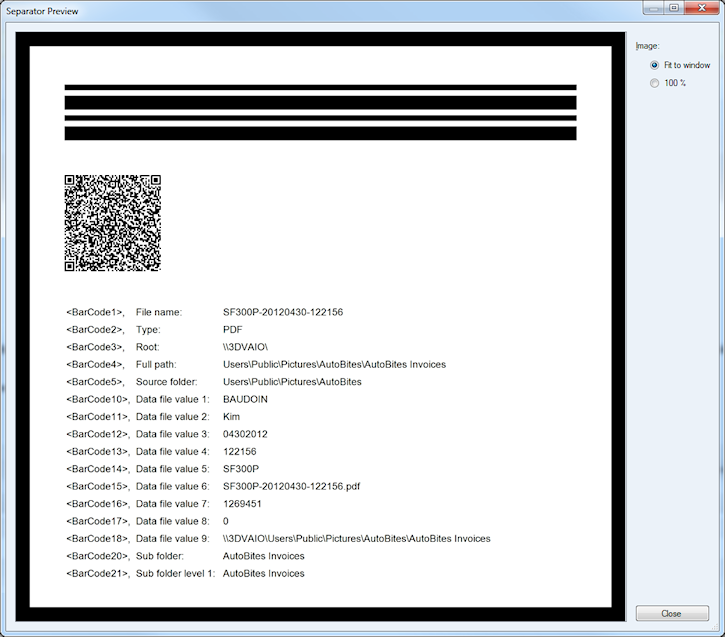
Here you find a description of each bar code value contained in the bar code (QR Code) on the AutoBites separator sheet.
Use this tab as a guideline to map the bar code values with your Kofax Express index fields.
Metadata file: Enable this option to store the data contained in a paired metadata file in the QR code on the separator sheet.
In that way the metadata can be used in Kofax Express index fields.
A paired metadata file typically needs to have the same name as the document file it belongs to. For example 12345.pdf goes together with 12345.xml.
The metadata file typically contains data about the user who logged in the networked scan device, the name of the device itself, date and time when the document was scanned and any index information that was typed in on the touch screen of the device.
We currently support following metadata file types:
- Canon ScanFront XML
- Kofax Express XML
- Xerox Document Centre XST Files
- Xerox ColorQube XST Files
- Cumulus Pro configuration.xml files
- If your MFP or digital copier’s metadata file is not supported, please contact us.
<BarCode10> through <BarCode19> are used to store the metadata. Every device has its own metadata format. If you want to use XML output from other devices or systems, please contact us.
Keep separator sheet: The AutoBites QR Code separator sheet is used to pass information about the original source files to Kofax Express. Once it served its purpose, you typically don’t want to keep this sheet. Therefore AutoBites makes use of the Delete first page option in the Kofax Express Job Setup tab to delete the separator sheet. If you want to keep the separator sheet after all, you can do so by enabling the Keep separator sheet option.
Show Last Separator: The AutoBites separator sheet with QR Code is used to transport information related to each document to Kofax Express. Once the separator has arrived in Kofax Express and used to populate index fields, it is deleted during export. Consequently the AutoBites separator sheet has a very short lifespan. With this function you can view the separator sheet of the last processed document and inspect the values it carries. Below is a preview of a separator sheet also including XML data generated by a networked scanner.
9.5 Errors
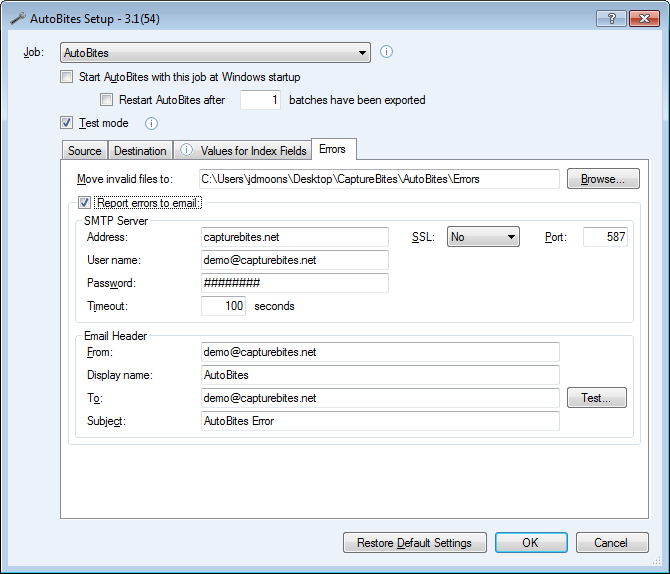
Move invalid files to: Define the invalid files path. Any files that fail to import will be moved in this path. When one or more files are moved in this folder, a hyperlink will be displayed in the main AutoBites window: X files failed import. Clicking this hyperlink opens the folder in explorer.
Report errors to email: This option reports any AutoBites errors to the specified email address. You can configure this differently per job.
By default we are using the CaptureBites SMTP server settings for demo purposes, but once in production they should be configured with your own SMTP settings. Contact your IT manager to get the correct settings.
For demos, you can easily change the “To email’” to your own email address for tests and keep all the default CaptureBites SMTP demo settings.
9.6 Main Buttons
Activate… button
Use this button to enter an activation code to switch AutoBites to full production mode. This will open the AutoBites activation panel where you can enter your unique Activation Code. An AutoBites activation code is linked with the Kofax Express Serial Number and License level and can only be used with one license of Kofax Express.
Restore Default Settings
Feel free to experiment with any of the AutoBites settings, you can always go back to the default settings by clicking the Restore Default Settings button.
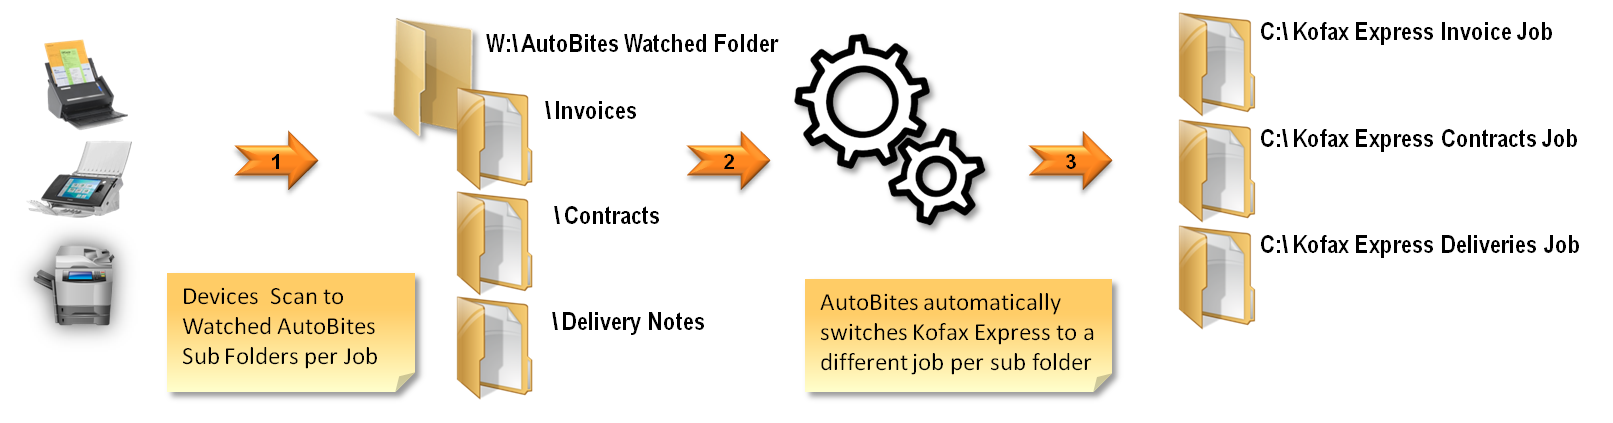
10. Automatic Job Switching
If you have different document types which need to be process with different Kofax Express jobs such as purchase orders, proof of deliveries, invoices, etc., then you can automatically switch to the correct job by placing image files in a specific folder.
The folder just needs to have the same name as the job you want to export to.
Auto Job-Switching is defined in the AutoBites setup.
If you select “Auto Job-Switching” as the Job, then Kofax Express will automatically switch to the Job with the same name as the sub folder in which images arrive.
Make sure that the sub folder names exactly match the Kofax Express Job names.
The graphic below is self explanatory.
11. Your suggestions are welcome!
Share with us your ideas about how to use AutoBites or let us know how to improve AutoBites by clicking here.